Good Morning and *+*MERRY CHRISTMAS*+*!! I hope you are all having a wonderful day and you can spend time with your loved ones and I hope Santa is really good to you!! *wink*
Santa left me some really really sweet gifts!! A set of Copic markers and glitter pens!! Woo-hoo!! I will have to tell you more later but I hope you have a really great Christmas Day!!!
Smiles!
Heidi

Tuesday, December 25, 2007
Saturday, December 22, 2007
Secret Santa Card
This is a card I made for my Mom to give with her finally Secret Santa gift. I had a lot of fun with this card! Can you tell? Lots of BLING!!  Here is a close up of the tree and presents. For the tree I used the Glorious Garlands stamp set and Green Galore CS with Glorious Green ink. Then I sponged the edges, added the silver trim, rhinestones and stickles. For the star I used a piece of chipboard from the SU On Board Blossoms & Basics, painted it white, added stickles and a rhinestone. For the edges of the card I stamped using versa mark and then embossed with silver EP. Also to give the edges a frosted look I inked them with versa mark & embossed.
 When the ribbon is untied the front of the card opens to reveal a Secret Santa poem.
Click image to enlarge. ~ Click image to enlarge and you can read the poem. ~
 Click image to enlarge. This is the inside of the card. ~
 Supplies~
Stamps~SU-Glorious Garland, Autumn Leaves-Flourishes
Paper~SU-Whisper White, Real Red, Green Galore, Glorious Green, The Christmas Stack-DP
Ink~SU-Versa Mark, Real Red, Glorious Green
Other~SU-On Board Blossoms & Basics, Ranger-Stickles, Jo-Ann's-Ribbon, Rhinestones, Trim
I don't know if I will get another chance to post before Christmas everything is so busy right now as I'm sure you all understand. *wink* We still have a little shopping to do, some goodies to make and tons of presents to wrap because you know Santa's elves are crazy like that with leaving the wrapping till the last few days!! LOL!
My hope and wish for you this holiday seasons is that you are able to spends time with family, friends and those you hold dear to your heart. Even though this is a really busy time of year let us not forget the real meaning of Christmas. *+*Peace*+*
Thanks for stopping by!
Smiles!
Heidi
 Here is a close up of the tree and presents. For the tree I used the Glorious Garlands stamp set and Green Galore CS with Glorious Green ink. Then I sponged the edges, added the silver trim, rhinestones and stickles. For the star I used a piece of chipboard from the SU On Board Blossoms & Basics, painted it white, added stickles and a rhinestone. For the edges of the card I stamped using versa mark and then embossed with silver EP. Also to give the edges a frosted look I inked them with versa mark & embossed.
 When the ribbon is untied the front of the card opens to reveal a Secret Santa poem.
Click image to enlarge. ~
 Click image to enlarge and you can read the poem. ~
 Click image to enlarge. This is the inside of the card. ~
 Supplies~
Stamps~SU-Glorious Garland, Autumn Leaves-Flourishes
Paper~SU-Whisper White, Real Red, Green Galore, Glorious Green, The Christmas Stack-DP
Ink~SU-Versa Mark, Real Red, Glorious Green
Other~SU-On Board Blossoms & Basics, Ranger-Stickles, Jo-Ann's-Ribbon, Rhinestones, Trim
I don't know if I will get another chance to post before Christmas everything is so busy right now as I'm sure you all understand. *wink* We still have a little shopping to do, some goodies to make and tons of presents to wrap because you know Santa's elves are crazy like that with leaving the wrapping till the last few days!! LOL!
My hope and wish for you this holiday seasons is that you are able to spends time with family, friends and those you hold dear to your heart. Even though this is a really busy time of year let us not forget the real meaning of Christmas. *+*Peace*+*
Thanks for stopping by!
Smiles!
Heidi
Thursday, December 13, 2007
Last Christmas Card Club
I can't believe how fast the past few months have went by! I had so much fun doing the Christmas Club this year and I think all of the ladies had a good time as well. Here are the cards from our last get together.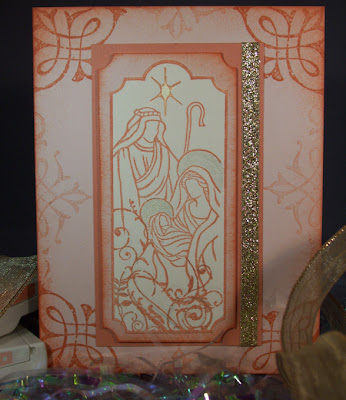 I was very happy with how this card turned out. The groovy guava, blush blossom and very vanilla all compliment each other. I added little touches of gold with the ribbon and gold twinkling H2O's.
Click to enlarge~
 Supplies~
Paper~SU-Groovy Guava, Blush Blossom, Very Vanilla
Stamps~SU-Carte Postale, Holy Triptych
Ink~SU-Groovy Guava
Other~SU-Ticket Corner Punch, Sponges, LuminArte-Gold Twinkling H2o's, My Stash-Gold Ribbon This card makes me think of frosted juniper berries. Before my youngest was born I was a manager at a local floral shop and one of my favorite things to do with the winter floral arrangements was to frost or glitter them. They always looks so pretty with all of the sparkles.
Click to enlarge~ Supplies~
Paper~SU-Blue Bayou, Bashful Blue, Vellum
Stamps~SU-Oh So Lovely (hostess), Holiday Wishes, Print Pattern
Ink~SU-Blue Bayou, Whisper White (craft ink), Black Stazon
Other~SU-Watercolor Wonder Crayons, Aqua Painter, Distress Tool, 1/16 Circle Punch, 2-Way Glue Pen, Dazzling Diamond Glitter, Silver Brads, Sponges, My Stash-Silver Metallic Pen, Ribbon I know this is non-traditional Christmas colors but I love the pink & green combo with all of the sparkle & bling.
Click to enlarge~
 Supplies~
Paper~SU-Whisper White, Pretty In Pink, Green Galore
Stamps~SU-Glorious Garlands
Ink~SU-Pretty In Pink, Green Galore, Basic Black
Other~SU-Ticket Corner Punch, Scalloped Punch, 1/8" Circle Punch, 1" Circle Punch, Sponges, Dimensionals, Stickles-Lime Green, Silver, Diamond, My Stash-Rhinestones, Pink Ribbon
Thanks so much for stopping by & looking!! I hope you have enjoyed the Christmas cards from club this year and maybe they have given you an idea or some inspiration. Good Luck with your Christmas cards--I'm still trying to finish up mine!
Just a side note~Thank you so much for you kind words and well wishes for our little guy!! He is doing really good but still has to get a lot of rest.
Hope you are having a wonderful week!!
Smiles!
Heidi
 I was very happy with how this card turned out. The groovy guava, blush blossom and very vanilla all compliment each other. I added little touches of gold with the ribbon and gold twinkling H2O's.
Click to enlarge~
 Supplies~
Paper~SU-Groovy Guava, Blush Blossom, Very Vanilla
Stamps~SU-Carte Postale, Holy Triptych
Ink~SU-Groovy Guava
Other~SU-Ticket Corner Punch, Sponges, LuminArte-Gold Twinkling H2o's, My Stash-Gold Ribbon
 This card makes me think of frosted juniper berries. Before my youngest was born I was a manager at a local floral shop and one of my favorite things to do with the winter floral arrangements was to frost or glitter them. They always looks so pretty with all of the sparkles.
Click to enlarge~
 Supplies~
Paper~SU-Blue Bayou, Bashful Blue, Vellum
Stamps~SU-Oh So Lovely (hostess), Holiday Wishes, Print Pattern
Ink~SU-Blue Bayou, Whisper White (craft ink), Black Stazon
Other~SU-Watercolor Wonder Crayons, Aqua Painter, Distress Tool, 1/16 Circle Punch, 2-Way Glue Pen, Dazzling Diamond Glitter, Silver Brads, Sponges, My Stash-Silver Metallic Pen, Ribbon
 I know this is non-traditional Christmas colors but I love the pink & green combo with all of the sparkle & bling.
 Click to enlarge~
 Supplies~
Paper~SU-Whisper White, Pretty In Pink, Green Galore
Stamps~SU-Glorious Garlands
Ink~SU-Pretty In Pink, Green Galore, Basic Black
Other~SU-Ticket Corner Punch, Scalloped Punch, 1/8" Circle Punch, 1" Circle Punch, Sponges, Dimensionals, Stickles-Lime Green, Silver, Diamond, My Stash-Rhinestones, Pink Ribbon
Thanks so much for stopping by & looking!! I hope you have enjoyed the Christmas cards from club this year and maybe they have given you an idea or some inspiration. Good Luck with your Christmas cards--I'm still trying to finish up mine!
Just a side note~Thank you so much for you kind words and well wishes for our little guy!! He is doing really good but still has to get a lot of rest.
Hope you are having a wonderful week!!
Smiles!
Heidi
Tuesday, December 11, 2007
I haven't forgotten!! *wink*
Hello!! Did you think I might have forgotten about all of you? I just wanted to do a real quick post to let you know I am still here & hope to be back within the next day or two. Our youngest just had surgery to remove his tonsils and adenoids and have tubes put in his years. The surgery went really good --he was such a trooper!! The doctor & nurses said he did such a great job!! Now we are just trying to keep as much fluid going as possible. Lots of popsicles & ice cream!!
To all of my SB3 Sisters thank you so much for stopping by and all of the wonderful comments!! I hope to catch up with you all of you very soon!!!
Thanks for stopping by!! So many winter storms have been passing through--if you live in those areas I hope you are staying safe & warm!! Have a great week--I'll be back as soon as I can!! *wink*
Smiles!
Heidi
Thursday, December 6, 2007
Amethyst Wishes
Here is a card I made this past weekend using a tent topper style. I really like the different shapes these cards can have and they still fit inside a standard envelope. For the topper part I used two scalloped ovals that I cut out using the Wizard and Spellbinders Nestabilities-Large Classic Scalloped Ovals. But if you don't own the Wizard or the Nestabilities you could also use large punches, templates, shape cutters or cut out different shapes using your paper cutter.
On the smaller oval I stamped the flower image using black stazon ink, embossed the sentiment using versa mark and gold EP, then I used my watercolor crayons for the watercolor. You might notice some darker flecks in the watercolor, I wanted to give it a little more depth so I had my watercolor paper very wet while I was working on it, flipped it over and blotted on a clean piece of paper several times while working on it. Doing this will give it the fleck marks.
For the background piece I used a Cuttlebug Embossing Folder and ran it through the Wizard. Then I lightly rubbed versa mark in over the entire piece and dusted it with perfect pearls.
 For an embellishment I added a prima flower, a jewelry finding for some bling and a touch of stickles for the glitter.
Click to enlarge~
 Here is a Tip* Instead of spending a ton on some new bling let your Girlfriends, Mom and Grandma know that you would love to recycle their jewelry, hit the thrift stores, estate sales, yard sales or the clearance sales and look for jewelry that you can take apart and use for some fun bling! You will be amazed at all the great finds and all the money you can save!! The little touch of bling on my card came from a necklace that my Mom had. Thanks Mom!! ;)
Supplies~
Paper~SU-Whisper White, Lavender Lace, Almost Amethyst, Watercolor
Stamps~SU-Oh So Lovely (hostess), Hugs & Wishes
Ink~SU-Versa Mark, Black Stazon
Other~SU-Watercolor Crayons (Bright & Bold), Gold EP, Aqua Painter, 1/8 in Circle Punch, Spellbinders-Wizard Die Cutting and Embossing Machine, Large Classic Scalloped Oval Nestabilities, Ranger-Perfect Pearls, Stickles-Diamond, Cuttlebug-Embossing Folder, Prima, My Stash-Metallic Gold Pen, White Sheer Ribbon & Jewelry Finding.
I think winter is here!! It has been so cold and snowing most of the day here. I had to cancel my stamping class tonight do to all of the blowing snow. :( Stay warm and if you are in some nice sunny or tropical place--lucky you--enjoy!! *wink* Thanks so much for stopping by today!!
Smiles!
Heidi
On the smaller oval I stamped the flower image using black stazon ink, embossed the sentiment using versa mark and gold EP, then I used my watercolor crayons for the watercolor. You might notice some darker flecks in the watercolor, I wanted to give it a little more depth so I had my watercolor paper very wet while I was working on it, flipped it over and blotted on a clean piece of paper several times while working on it. Doing this will give it the fleck marks.
For the background piece I used a Cuttlebug Embossing Folder and ran it through the Wizard. Then I lightly rubbed versa mark in over the entire piece and dusted it with perfect pearls.
 For an embellishment I added a prima flower, a jewelry finding for some bling and a touch of stickles for the glitter.
 Click to enlarge~
 Here is a Tip* Instead of spending a ton on some new bling let your Girlfriends, Mom and Grandma know that you would love to recycle their jewelry, hit the thrift stores, estate sales, yard sales or the clearance sales and look for jewelry that you can take apart and use for some fun bling! You will be amazed at all the great finds and all the money you can save!! The little touch of bling on my card came from a necklace that my Mom had. Thanks Mom!! ;)
Supplies~
Paper~SU-Whisper White, Lavender Lace, Almost Amethyst, Watercolor
Stamps~SU-Oh So Lovely (hostess), Hugs & Wishes
Ink~SU-Versa Mark, Black Stazon
Other~SU-Watercolor Crayons (Bright & Bold), Gold EP, Aqua Painter, 1/8 in Circle Punch, Spellbinders-Wizard Die Cutting and Embossing Machine, Large Classic Scalloped Oval Nestabilities, Ranger-Perfect Pearls, Stickles-Diamond, Cuttlebug-Embossing Folder, Prima, My Stash-Metallic Gold Pen, White Sheer Ribbon & Jewelry Finding.
I think winter is here!! It has been so cold and snowing most of the day here. I had to cancel my stamping class tonight do to all of the blowing snow. :( Stay warm and if you are in some nice sunny or tropical place--lucky you--enjoy!! *wink* Thanks so much for stopping by today!!
Smiles!
Heidi
Tuesday, December 4, 2007
Sisterhood of the Blogging Stampers
 I joined a new group a couple of days ago called Sisterhood of the Blogging Stampers. I am in Group #3 and I am very excited to meet all of the sisters! I happened to come across the SBS link on Flossie’s Blog and I thought it sounded like a lot of fun. I think this will be a great way to meet some new friends, see some amazing design work, leave comments & encourage each other in our creative journey. Thank you to all of the sisters stopping by!! I can’t wait to check out all of your blogs, see your design work and get to know each of you!!
Here’s a little bit about me~
Heidi
Saturday, December 1, 2007
Time Well Spent
Don't you just love getting a Surprise in the mail? I know I sure do!! Recently I received a wonderful gift in the mail, it was a new stamp set from SU!! Gotta love that!! The stamp sets were a Appreciation gift from Shelli Gardner, Co-founder and CEO of SU. All of the SU demonstrators were given the Time Well Spent stamp set, it will be featured in the New Spring & Summer Catty as a Level 3 Hostess Set. Thank You Shelli & SU!!
Here are a couple of cards that I designed with the Time Well Spent stamp set. ~
 Click to enlarge~
 Click to enlarge~
 Supplies~
Paper~SU-Blue Bayou, Whisper White, Vellum, DP-The Luxury Stack
Stamps~SU-Time Well Spent
Ink~SU- Blue Bayou, Versa Mark
Other~Carolace-Ivory Trim, SU-Crystal Effects, Silver EP, My Stash-Lg Deco Silver Brad, Rhinestones
 Click to enlarge~
 Click to enlarge~
 Supplies~
Paper~SU-Vellum, Barely Banana, Rose Red, Always Artichoke
Stamps~SU-Time Well Spent
Ink~SU-Versa Mark, Barely Banana, Markers--Rose Red, Regal Rose, Always Artichoke, Mellow Moss
Other~Spellbinders-Nestabilities Classic Lg Scalloped Oval, Wizard, SU-Gold EP, Gold Brads, Dew Drops-Pointsetta, My Stash-Green Velvet Ribbon, Gold Flower Brad
The NEW catty starts in January!! I can't wait to see all of the new stamp sets!!
Thank you so much for stopping by! I hope you are all having a great weekend! We are having our 1st Winter Storm here in the North--brrrr it's COLD!! A great time to stay inside and stamp! *wink*
Smiles!
Heidi
Monday, November 26, 2007
Angel Snow Globe
So did you all have a nice Thanksgiving & lots of yummy food? I hope it was a wonderful day for all!
How many of you hit the stores for Black Friday? I didn't make it out at all on Friday, our little guy ended up getting sick Thursday evening so we spent most of the weekend at home. But Eric was up early and hit the stores for some good deals. He bought some presents for the boys and a new Christmas tree--a pre-lit one! The tree that we had was still in great shape but it took forever to get it put up and then add all the lights & decorations! This was so slick it was up and fluffed out in about an hour--gotta love that! The ornaments took a little longer but for the most part the tree is decorated but I am still trying to figure out what to do for the top. What does the top of your tree look like? Do you have a star, angel, ribbons or nothing at all? We have been looking for a really pretty star or angel for the last couple of years but just haven't had much luck. It seems like most of the trees that you see all done up in the stores just have ribbons or nothing at all on the top. I would love to hear what you do for your tree top! Once I figure out what we are doing I will take some pictures to share with you.
Have you seen the tutorial on Splitcoaststampers for these adorable little Snow Globes? Vickie Garrett has a wonderful tutorial for the Snow Globes and you can click HERE to check it out! I made one of these a few days ago but I didn't have all of the materials so this is my own little version. *wink*
 I have looked at a few different stores here in our town & I haven't been able to find the bigger clear ornaments. I have found a ton of the tiny ones & standard size so I have been thinking & thinking what could I do to alter this a little & still make it work?? If I use the standard size over 1/2 of it ended up in the little can and it just didn't look right. So I got an idea and went with it! What do you think? Instead of using a can I used a clear votive holder.
Here's what I did~
First I lined it with silver paper, filled it with snow and then used clear silicone to adhere the two pieces together (ornament & votive holder). Once it was dry then I brushed crystal effects over the votive holder and sprinkled dazzling diamond glitter over it.
Supplies~
Paper~3M-Transparencies Here's a little tip*If you aren't planning on heat embossing but would like to stamp with a permanent ink and do other techniques with transparencies buy the Write-on Transparency Film. It is a lot less expensive (about $10-$15 for a box of 100).
Stamps~SU-Holy Triptych
Ink~SU-Stazon
Other~SU-Crystal Effects, Dazzling Diamond Glitter, WM-Snow, Clear Votive Holder, Sharpie Markers, Jo-Ann's-Clear Glass Ornaments
Thanks so much for stopping by! I hope you are having a great week and enjoying the beginning of the Holiday Season!
Smiles!
Heidi
Thursday, November 22, 2007
Happy Thanksgiving!!
I hope you all have a wonderful day spent with your family & friends & lots & lots of yummy, yummy food!! I don't have any cards for today but I do have some really special artwork & a few pretty pictures. Hope you enjoy!
Sunrise~
 Artwork~
 This last Sunday we had a few snow flurries but it all melted as soon as it hit the ground. But last night it started snowing and this morning we woke up to a beautiful blanket of snow.
Our 1st Snow~


 Once again Happy Thanksgiving to all!!!
Smiles!
Heidi
Sunrise~

 Artwork~
 This last Sunday we had a few snow flurries but it all melted as soon as it hit the ground. But last night it started snowing and this morning we woke up to a beautiful blanket of snow.
Our 1st Snow~


 Once again Happy Thanksgiving to all!!!
Smiles!
Heidi
Wednesday, November 21, 2007
Christmas Ornaments
I have been having soooo much fun making these!! SCS has a wonderful tutorial by Vickie Maduzia click HERE to check it out! Thank you Vickie!!
 Stamp~PSX (K-2754)
 Stamp~Northwoods Rubber Stamps
 Stamps~PSX (K-1884)
These Christmas ornaments are very easy & fast to make. They also make wonderful Christmas presents. Only a few supplies are needed to made these. The main things are transparencies, clear ornaments & sharpie markers but for all of the details don't forget to check out the tutorial on SCS. These can be done simple or as fancy as you would like. Be creative!
Here's a tip for you~If you would like to try shading when you are coloring in the image first go over the area with the lightest color. Come back in with the darker color going along the edges or where ever you would like the colors to be darker. Then come back in again with the lighter color and blend. When you do this you have to do a little and then scribble your marker on a piece of scratch paper to clean the tip and then go back and blend some more. HTH!
Thank you for stopping by today and I hope that you are having a wonderful day!!
Tuesday, November 20, 2007
Spellbinders DT Submissions Part 2
As promised Part 2~
As soon as I found out we needed to submit something with stamping I knew exactly what I wanted to do! Stampscapes!! If you haven't used Stampscapes or maybe if you haven't ever seen them before I strongly urge you to check out the website. They have some truly amazing design work on there and so many beautiful stamps to choose from!
My husband, Eric is the one who introduced me to Stampscapes. I have to be honest I'm more into the girly & artsy stamps so several years ago when I was first introduced to them I didn't really know if they would be my kind of stamp. But with some encouragement (ok a lot!) from Eric I started working with them and I have grown to LOVE them!! After working with them I found out they are not as intimidating as they look! LOL! They are actually what I would call very user friendly. When working with Stampscapes your imagination is your only limitation!! You can use just one stamp or half a dozen to create some beautiful art! Over the years I have taught several classes using Stampscapes and people are always amazed at what they can create. *If you check out the the slide gallery you can see a Stampscapes card (with a wolf-the wolf isn't stampscapes) that I taught for one of my classes.
Stampscapes Shadow Box Card~
 Awhile back I found a wonderful tutorial by Dawn Griffith on SCS for the Shadow Box Card. Click HERE for the link. I knew it would be perfect for this card! I used 9 stamps from Stampscapes to make this card.
Fishing Vest~
 Fish~
Fish~
 The die cuts were made using Spellbinders Wizard-Embossing & Die Cutting System. To add the fine details to the Gone Fishing sign, vest and the fish took five steps--1-Embossing, 2-Chalk, 3-Markers, 4-Inks (sponge & brush), 5-White Gel Pen. After I cut out each piece I left them in the die & used the die as a stencil for adding detail.
Looking up to the sky~

Supplies~
Paper~SU-Very Vanilla, River Rock, Mellow Moss, Kraft
Ink~SU-Wild Wasabi, Chocolate Chip (pad & marker), River Rock, Mellow Moss (pad & marker), Creamy Caramel, Close to Cocoa, Always Artichoke (pad & marker), Jet Black Stazon, White gel Pen
Stamps~Stampscapes-Oak Branch-203G, Fisherman in Boat-187B, Lakeside Cove Lg-049G, Cascading Falls Lg-015G, Tree Duo-085A, Rocky Peaks-188F, Cloud with Sun-108G, Cloud (Cumulus)-018E, Geese in Flight-039A
Other~Spellbinders-Wizard Embossing & Die Cutting System, Gone Fishing S4 037 Embossing & Stenciling Die, SU-Crystal Effects, Sticky Strip, Pastels (chalk), Linen Thread, My Stash-Shells, Sponges, Pop Dots, Eyelet & Q-tips
Ok here is the last item--the altered item. I think I might be doing a few more of these! *wink* But before I can show you what I did I want to share the before picture with you. I have also included a picture of the designer paper before I distressed it.
Metal Clutch Handbag (before)~
 Designer Paper~
Before I could really get into altering the handbag I covered the entire piece with two coats of Gesso. I used a white acrylic gesso which helped to adhere the paint, designer paper, die cuts and embellishments.
Altered Metal Clutch Handbag~
 So what do you think? I really, really want to use this!! But I am also afraid of something happening to it! My Husband, Eric works for Hormel Foods and the Corporate/Management Christmas Dinner & Dance is just around the corner--maybe I will have to find an outfit to match the handbag! lol!!
Here's a few close-up pictures so you can see all of the details~
Click on photos to enlarge~
 To alter/distress the the designer paper I started out by using an old gift card and some gesso. I swiped the card with gesso back and forth across the paper covering most of the paper. Let it dry. Then I took about a teaspoon of water and added several (30-40) drops of SU creamy caramel ink, took a sponge brush and quickly brushed across the entire piece of paper and let it dry. In the areas where there wasn't gesso it tinted the paper and gave it an aged look. Also once the handbag was altered I brushed Perfect Pearls (Perfect Gold) by Ranger over the entire piece and then sealed it.
Supplies~
Paper~Anna Griffin-Designer Paper, SU-Very Vanilla, Mellow Moss, Regal Rose
Ink~SU-Creamy Caramel (pad & refill ink), Mellow Moss, Always Artichoke, Regal Rose, Rose Red (pad & refill ink)
Other~Spellbinders-Wizard Embossing & Die Cutting System, Embossing & Stenciling Dies-Nestabilities-Classic Scalloped Oval Lg S4 111, Rose S3 001, SU-Pastels (chalk), Crystal Effects, Deco Art-Cloud White Patio Paint, Daler/Rowney-White Acrylic Gesso, Ranger-Perfect Pearls (perfect gold), Crackle Accents, The Robin's Nest-Dew Drops (poinsettia), Jo-Ann's-Gold Trim, Gold Rose Button, Swarovski Crystals-Light Topaz, Flat Pearls, Plaid-Mod Podge, Zig-Gold Metallic Paint Pen, WM-Metal Clutch Handbag, My Stash-Sponges, Q-tips
Once again Thank You so much for stopping by & checking out my blog!! I always love reading your comments!! I hope you don't get too sick of hearing me say I can't wait until January!! This next year is going to be a wonderful journey full of new friendships and creativity!! I hope you are having a Terrific Week!!
Smiles!
Heidi
As soon as I found out we needed to submit something with stamping I knew exactly what I wanted to do! Stampscapes!! If you haven't used Stampscapes or maybe if you haven't ever seen them before I strongly urge you to check out the website. They have some truly amazing design work on there and so many beautiful stamps to choose from!
My husband, Eric is the one who introduced me to Stampscapes. I have to be honest I'm more into the girly & artsy stamps so several years ago when I was first introduced to them I didn't really know if they would be my kind of stamp. But with some encouragement (ok a lot!) from Eric I started working with them and I have grown to LOVE them!! After working with them I found out they are not as intimidating as they look! LOL! They are actually what I would call very user friendly. When working with Stampscapes your imagination is your only limitation!! You can use just one stamp or half a dozen to create some beautiful art! Over the years I have taught several classes using Stampscapes and people are always amazed at what they can create. *If you check out the the slide gallery you can see a Stampscapes card (with a wolf-the wolf isn't stampscapes) that I taught for one of my classes.
Stampscapes Shadow Box Card~
 Awhile back I found a wonderful tutorial by Dawn Griffith on SCS for the Shadow Box Card. Click HERE for the link. I knew it would be perfect for this card! I used 9 stamps from Stampscapes to make this card.
Fishing Vest~
 Fish~
Fish~ The die cuts were made using Spellbinders Wizard-Embossing & Die Cutting System. To add the fine details to the Gone Fishing sign, vest and the fish took five steps--1-Embossing, 2-Chalk, 3-Markers, 4-Inks (sponge & brush), 5-White Gel Pen. After I cut out each piece I left them in the die & used the die as a stencil for adding detail.
Looking up to the sky~

Supplies~
Paper~SU-Very Vanilla, River Rock, Mellow Moss, Kraft
Ink~SU-Wild Wasabi, Chocolate Chip (pad & marker), River Rock, Mellow Moss (pad & marker), Creamy Caramel, Close to Cocoa, Always Artichoke (pad & marker), Jet Black Stazon, White gel Pen
Stamps~Stampscapes-Oak Branch-203G, Fisherman in Boat-187B, Lakeside Cove Lg-049G, Cascading Falls Lg-015G, Tree Duo-085A, Rocky Peaks-188F, Cloud with Sun-108G, Cloud (Cumulus)-018E, Geese in Flight-039A
Other~Spellbinders-Wizard Embossing & Die Cutting System, Gone Fishing S4 037 Embossing & Stenciling Die, SU-Crystal Effects, Sticky Strip, Pastels (chalk), Linen Thread, My Stash-Shells, Sponges, Pop Dots, Eyelet & Q-tips
Ok here is the last item--the altered item. I think I might be doing a few more of these! *wink* But before I can show you what I did I want to share the before picture with you. I have also included a picture of the designer paper before I distressed it.
Metal Clutch Handbag (before)~
 Designer Paper~
Before I could really get into altering the handbag I covered the entire piece with two coats of Gesso. I used a white acrylic gesso which helped to adhere the paint, designer paper, die cuts and embellishments.
Altered Metal Clutch Handbag~
 So what do you think? I really, really want to use this!! But I am also afraid of something happening to it! My Husband, Eric works for Hormel Foods and the Corporate/Management Christmas Dinner & Dance is just around the corner--maybe I will have to find an outfit to match the handbag! lol!!
Here's a few close-up pictures so you can see all of the details~
Click on photos to enlarge~

 To alter/distress the the designer paper I started out by using an old gift card and some gesso. I swiped the card with gesso back and forth across the paper covering most of the paper. Let it dry. Then I took about a teaspoon of water and added several (30-40) drops of SU creamy caramel ink, took a sponge brush and quickly brushed across the entire piece of paper and let it dry. In the areas where there wasn't gesso it tinted the paper and gave it an aged look. Also once the handbag was altered I brushed Perfect Pearls (Perfect Gold) by Ranger over the entire piece and then sealed it.
Supplies~
Paper~Anna Griffin-Designer Paper, SU-Very Vanilla, Mellow Moss, Regal Rose
Ink~SU-Creamy Caramel (pad & refill ink), Mellow Moss, Always Artichoke, Regal Rose, Rose Red (pad & refill ink)
Other~Spellbinders-Wizard Embossing & Die Cutting System, Embossing & Stenciling Dies-Nestabilities-Classic Scalloped Oval Lg S4 111, Rose S3 001, SU-Pastels (chalk), Crystal Effects, Deco Art-Cloud White Patio Paint, Daler/Rowney-White Acrylic Gesso, Ranger-Perfect Pearls (perfect gold), Crackle Accents, The Robin's Nest-Dew Drops (poinsettia), Jo-Ann's-Gold Trim, Gold Rose Button, Swarovski Crystals-Light Topaz, Flat Pearls, Plaid-Mod Podge, Zig-Gold Metallic Paint Pen, WM-Metal Clutch Handbag, My Stash-Sponges, Q-tips
Once again Thank You so much for stopping by & checking out my blog!! I always love reading your comments!! I hope you don't get too sick of hearing me say I can't wait until January!! This next year is going to be a wonderful journey full of new friendships and creativity!! I hope you are having a Terrific Week!!
Smiles!
Heidi
Monday, November 19, 2007
Spellbinders DT Submissions Part 1
I think I am still floating in the clouds!! I am so excited about being on the Spellbinders 2008 Design Team!! I have to say WOW I am so very fortunate to be in the company of all these very talented ladies!! I can't wait until January when we will all get to meet in Phoenix, Arizona .
I wanted to share with you the designs that I submitted for the DT. For the submissions we had to design four items, a 12 x 12 scrapbook LO, a card, an altered item & something with stamping. I am going to show you these in two different posts (part 1 & part 2) so make sure you check back! *wink*
As most of you know I'm somewhat new to the scrapbooking so this is going to be my big challenge of the year! But I am looking forward to it and most of my friends that scrapbook keep telling me to think of it as a huge card with pictures-lol! So that's what I did and I was really happy with how it turned out. I made the leaves and the tag using the Wizard and the Assorted Leaves
(S4 076) embossing & stenciling die and copper craft foil. I took these pictures of the boys a couple of years ago on a beautiful autumn day.
Click on the picture to enlarge~ Supplies~
Paper~CTMH-DP Free Spirit, SU-Ballet Blue, Chocolate Chip and So Saffron
Ink~SU-Chocolate Chip (pad & marker)
Other~Spellbinders-Wizard Embossing & Die Cutting System, Leaves (S4 076) & Tags 5 (S4 081) Embossing & Stenciling Dies, Cricut-George & Basic Shapes (Alphabet), SU-Ticket Corner Punch, Michael's-Copper Craft Foil, Copper Brads, Maple Leaf Brads, Horizon Fabrics- Brown/Gold Ribbon, My Stash-Pictures of my Angels *wink*
I had so much fun designing this card!! I knew I wanted to do something with the Butterfly Reflections (S3 038) embossing and stenciling die. I LOVE butterflies!! I thought about it for a couple of days, sketched it out and went to work. To add some dimension I rolled the petals of the flowers and some of the leaves. I also used silicone adhesive to attach all of the die cut pieces.
Click on the picture to enlarge~ Supplies~
Paper~K&Company-DP Roam, SU-Wild Wasabi, Blue Bayou, Close to Cocoa, Cameo Coral, Blush Blossom, Barely Banana & Vellum
Stamps~Outlines-Sentiment, Autumn Leaves-Rhonna Farrer-Word Flourishes
Ink~Ranger-Distress Ink Frayed Burlap, SU-Blue Bayou, Wild Wasabi, Green Garden (pad & marker), Cameo Coral (pad & marker), Close to Cocoa (pad & marker), Ruby Red (pad & marker)
Other~Spellbinders-Wizard Embossing & Die Cutting System, Butterfly Reflections (S3 038), Flower Creations (S4 072), Assorted Leaves
(S4 076), Bugs (S4 008) Embossing & Stenciling Dies, Ranger-Stickles Diamond, Perfect Pearls, Swarovski Crystals-Crystal & AB, Horizon Fabrics-Brown/Gold Ribbon, My Stash-Silicone, Sponges & Pop Dots.
I want to say "Thank You" for all of the wonderful comments you have left over the past few days!! I hope you enjoyed part 1 of my DT submissions and don't forget to check back to see the altered and stamping projects. I hope you had a Marvelous Monday!!
Smiles!
Heidi
I wanted to share with you the designs that I submitted for the DT. For the submissions we had to design four items, a 12 x 12 scrapbook LO, a card, an altered item & something with stamping. I am going to show you these in two different posts (part 1 & part 2) so make sure you check back! *wink*
As most of you know I'm somewhat new to the scrapbooking so this is going to be my big challenge of the year! But I am looking forward to it and most of my friends that scrapbook keep telling me to think of it as a huge card with pictures-lol! So that's what I did and I was really happy with how it turned out.
 I made the leaves and the tag using the Wizard and the Assorted Leaves
(S4 076) embossing & stenciling die and copper craft foil. I took these pictures of the boys a couple of years ago on a beautiful autumn day.
Click on the picture to enlarge~
 Supplies~
Paper~CTMH-DP Free Spirit, SU-Ballet Blue, Chocolate Chip and So Saffron
Ink~SU-Chocolate Chip (pad & marker)
Other~Spellbinders-Wizard Embossing & Die Cutting System, Leaves (S4 076) & Tags 5 (S4 081) Embossing & Stenciling Dies, Cricut-George & Basic Shapes (Alphabet), SU-Ticket Corner Punch, Michael's-Copper Craft Foil, Copper Brads, Maple Leaf Brads, Horizon Fabrics- Brown/Gold Ribbon, My Stash-Pictures of my Angels *wink*
I had so much fun designing this card!! I knew I wanted to do something with the Butterfly Reflections (S3 038) embossing and stenciling die. I LOVE butterflies!! I thought about it for a couple of days, sketched it out and went to work.
 To add some dimension I rolled the petals of the flowers and some of the leaves. I also used silicone adhesive to attach all of the die cut pieces.
Click on the picture to enlarge~
 Supplies~
Paper~K&Company-DP Roam, SU-Wild Wasabi, Blue Bayou, Close to Cocoa, Cameo Coral, Blush Blossom, Barely Banana & Vellum
Stamps~Outlines-Sentiment, Autumn Leaves-Rhonna Farrer-Word Flourishes
Ink~Ranger-Distress Ink Frayed Burlap, SU-Blue Bayou, Wild Wasabi, Green Garden (pad & marker), Cameo Coral (pad & marker), Close to Cocoa (pad & marker), Ruby Red (pad & marker)
Other~Spellbinders-Wizard Embossing & Die Cutting System, Butterfly Reflections (S3 038), Flower Creations (S4 072), Assorted Leaves
(S4 076), Bugs (S4 008) Embossing & Stenciling Dies, Ranger-Stickles Diamond, Perfect Pearls, Swarovski Crystals-Crystal & AB, Horizon Fabrics-Brown/Gold Ribbon, My Stash-Silicone, Sponges & Pop Dots.
I want to say "Thank You" for all of the wonderful comments you have left over the past few days!! I hope you enjoyed part 1 of my DT submissions and don't forget to check back to see the altered and stamping projects. I hope you had a Marvelous Monday!!
Smiles!
Heidi
Thursday, November 15, 2007
Exciting News!!!
Woo-Hoo!! It's Official!!! I am so thrilled to have been asked to join the Spellbinders 2008 Design Team!! I am so excited and honored to be given this opportunity! Spellbinders' website has all of the exciting news--check it out HERE!
The Spellbinders' 2008 Design Team~
Beth Pingry, Naperville, Illinois
Cathy Chlebana, Chicago, Illinois
Donya Schroeder, Ionia, Iowa
Heidi Blankenship, Albert Lea, Minnesota
Holly Craft, Lawrenceville, Georgia
Jeni Caulkins, Mesa, Arizona
Jennifer Ellefson, Cranberry Township, Pennsylvania
Linda Duke, Tulare, California
Michelle Klomp, Oak Harbor, Washington
Sally Lynn MacDonald, Sandy Hook, Connecticut
Sharon Harnist, Grand Prairie, Texas
Wendy Weixler, Salt Lake City, Utah
Congratulations to everyone!!!
Smiles!
Heidi
Wednesday, November 14, 2007
November Card Class
I can't believe we are already half way through November!! Where does the time go? I know it is really starting to feel like November outside, it is getting cold here in the North! We even had a few flurries today.
This is going to be a quick post! I want to share the cards with you that we made for the November Card Club, but I will have to come back later & fill in all the little details. I have the last Christmas Card Club tomorrow night & I still have a LOT of paper to cut!! So let's get to the cards! *wink*
The first card~

 This was a really fun technique using Vaseline--who knew! I really like the color combo on this one.
The third card~ I'm calling this one Aged Gesso. Does that sound like a good name for a technique? I was recently doing an altered item and I wanted the paper to have a more aged/vintage look and this is what I came up with. I will have to take a picture of the paper before I altered it and add it to the post when I add the rest of the details.
Thanks so much for stopping by & I will try to get all of the info added asap! I hope you are having a Fantastic Week!!!
This is going to be a quick post! I want to share the cards with you that we made for the November Card Club, but I will have to come back later & fill in all the little details. I have the last Christmas Card Club tomorrow night & I still have a LOT of paper to cut!! So let's get to the cards! *wink*
The first card~

I think this one is one of my favorites! It didn't show up to well in the picture but IRL the card has a really soft gold shimmer.
The second card~
 This was a really fun technique using Vaseline--who knew! I really like the color combo on this one.
 The third card~
 I'm calling this one Aged Gesso. Does that sound like a good name for a technique? I was recently doing an altered item and I wanted the paper to have a more aged/vintage look and this is what I came up with. I will have to take a picture of the paper before I altered it and add it to the post when I add the rest of the details.
Thanks so much for stopping by & I will try to get all of the info added asap! I hope you are having a Fantastic Week!!!
Tuesday, November 13, 2007
Angel Baby
This is one of my all time favorite stamps! I know it's not a newer one but I have used it on so many cards & for so many different occasions. The image of the Angel Baby just gives me a sense of peace and innocences.  Sometimes with photography it can be so hard to capture the shimmering details. I keep playing around with the lighting trying to get the perfect picture and I think this one shows detail but also the softness of the colors. The Scalloped Oval is made using the Nestabilities Die Cuts from Spellbinders. I used watercolor paper for the embossed oval. The angel image is stamped using black stazon ink. To achieve the soft coloring I started out by picking three pastel colors of ink, Barely Banana, Pretty In Pink & Bashful Blue. I lightly misted the watercolor paper with water, inked up a sponge with barely banana and blotted off most of the ink. *If you were painting something and used this technique it would be known as a dry brush.* Then starting in the center of the image I very lightly began to work in a small circular motion with the sponge. With each color I kept working the ink out to the edge of the oval. I also kept misting my paper which makes it easier to blend the inks. Once this was done I wanted to add a soft shimmer so I came in and highlighted different areas with twinkling H2O's. To finish off the oval I edged the scallops with a gold metallic pen, punched holes & wove the ribbon through. Also to add some shimmer to the background paper I lightly rubbed a versa mark ink pad over the embossed paper (Cuttlebug) and added some pearlex.
Supplies~
Paper~SU-Very Vanilla, Barely Banana, Watercolor Paper
Stamps~Stampendous
Ink~SU-Barely Banana, Pretty In Pink, Bashful Blue, Stazon-Black, Versa Mark
Other~Spellbinders-Nestabilities (large scalloped oval), Twinkling H2O's-Iridescent Gold, Iridescent Blue, SU-1/8" Circle Punch, 3/16"Corner Rounder Punch, Cuttlebug-Embossing Folder, Pearlex, My Stash-Ribbon, Popdots & Gold Metallic Pen
I hope you are having a wonderful first half to your week & thanks so much for stopping by!
Smiles!
Heidi
 Sometimes with photography it can be so hard to capture the shimmering details. I keep playing around with the lighting trying to get the perfect picture and I think this one shows detail but also the softness of the colors. The Scalloped Oval is made using the Nestabilities Die Cuts from Spellbinders. I used watercolor paper for the embossed oval. The angel image is stamped using black stazon ink. To achieve the soft coloring I started out by picking three pastel colors of ink, Barely Banana, Pretty In Pink & Bashful Blue. I lightly misted the watercolor paper with water, inked up a sponge with barely banana and blotted off most of the ink. *If you were painting something and used this technique it would be known as a dry brush.* Then starting in the center of the image I very lightly began to work in a small circular motion with the sponge. With each color I kept working the ink out to the edge of the oval. I also kept misting my paper which makes it easier to blend the inks. Once this was done I wanted to add a soft shimmer so I came in and highlighted different areas with twinkling H2O's. To finish off the oval I edged the scallops with a gold metallic pen, punched holes & wove the ribbon through. Also to add some shimmer to the background paper I lightly rubbed a versa mark ink pad over the embossed paper (Cuttlebug) and added some pearlex.
Supplies~
Paper~SU-Very Vanilla, Barely Banana, Watercolor Paper
Stamps~Stampendous
Ink~SU-Barely Banana, Pretty In Pink, Bashful Blue, Stazon-Black, Versa Mark
Other~Spellbinders-Nestabilities (large scalloped oval), Twinkling H2O's-Iridescent Gold, Iridescent Blue, SU-1/8" Circle Punch, 3/16"Corner Rounder Punch, Cuttlebug-Embossing Folder, Pearlex, My Stash-Ribbon, Popdots & Gold Metallic Pen
I hope you are having a wonderful first half to your week & thanks so much for stopping by!
Smiles!
Heidi
Sunday, November 11, 2007
Be Merry
Ok this has to be one of the simplest cards I have ever made but at the same time I am just tickled with it. I love the simplicity of it! I had this idea in my head for the last week an a half but I hadn't had the time to actually design it.  I made the die cut images using the Wizard & Spellbinders Leaves Die. I thought the leaves looked kind of like a boxwood leaf that is used in a lot of Christmas floral arrangements. After I was done cutting & embossing the leaves I wanted to add some detail to them. For this you have to do one die cut at a time. I popped the leaf back into the die & used the die as a stencil. First I went over the leaf with chalk, starting from the bottom & working my way to the top of the leaves. Next I outlined the bottom of the leaves with a marker. Then I inked up a sponge & blotted some of the ink off, starting from the bottom of the leaves & swiped the sponge towards the top of the leaves. I know this might sound like a lot but it really goes a lot faster than it sounds. This card only took about 10 minutes. It also adds so much depth & detail to the die cut.
Supplies~
Paper~SU-Real Red, Whisper White, Wild Wasabi
Stamps~SU-Warm Words
Inks~SU-Real Red, Garden Green (pad, marker & ink)
Other~Spellbinders-Leaves Die, Offray-Red Ribbon, Ranger-Stickles, My Stash-Sequins
Thanks so much for stopping by & I hope everyone is having a wonderful weekend!!
Smiles!
Heidi
 I made the die cut images using the Wizard & Spellbinders Leaves Die. I thought the leaves looked kind of like a boxwood leaf that is used in a lot of Christmas floral arrangements. After I was done cutting & embossing the leaves I wanted to add some detail to them. For this you have to do one die cut at a time. I popped the leaf back into the die & used the die as a stencil. First I went over the leaf with chalk, starting from the bottom & working my way to the top of the leaves. Next I outlined the bottom of the leaves with a marker. Then I inked up a sponge & blotted some of the ink off, starting from the bottom of the leaves & swiped the sponge towards the top of the leaves. I know this might sound like a lot but it really goes a lot faster than it sounds. This card only took about 10 minutes. It also adds so much depth & detail to the die cut.
Supplies~
Paper~SU-Real Red, Whisper White, Wild Wasabi
Stamps~SU-Warm Words
Inks~SU-Real Red, Garden Green (pad, marker & ink)
Other~Spellbinders-Leaves Die, Offray-Red Ribbon, Ranger-Stickles, My Stash-Sequins
Thanks so much for stopping by & I hope everyone is having a wonderful weekend!!
Smiles!
Heidi
Tuesday, November 6, 2007
Sleigh Bells Ring Class
This past Saturday I had a stamping class here at the house and we made several project using just one stamp set. The set we used is SU Sleigh Bells Ring which can be found in the Fall & Winter Catty. The stamp set was included in the cost of the class & all of the sets had been ordered a few weeks before so each of the ladies had their own stamp set to work with. They said they really liked doing a class this way. They had new ideas & already had the stamp set so they didn't have to wait for an order, they could go home and keep creating.
For the class we made a card with a matching envy, a gift bag with matching tissue paper, a little chocolate treat bag & a glass Christmas ornament. But I am going to be saving the Christmas ornament for a different post so today I will be sharing the card, gift bag & treat bag with you.
The Card~
 The images were stamped with versa mark ink unto vellum & then I used gold EP & added some color with markers on the backside of the vellum. I really like the look when you color on the backside of the vellum, it gives a much softer look. For a touch of sparkle to the front I added some dazzling diamond glitter with a 2-way glue pen.
Supplies~
Paper~SU-Hunter Green, Real Red, Whisper White, Vellum
Stamps~SU-Sleigh Bells Ring
Ink~SU-Versa Mark, Hunter Green (pad & marker), Real Red (marker), Chocolate Chip (marker)
Other~SU-Gold Brads, Dimensionals, My Stash-Red Ribbon
The Gift Bag~ For the background piece I used the images from the Sleigh Bells Ring set & Night of Navy ink. I stamped off twice to get the really faded look. Also on the Night of Navy CS I inked the edges (direct ink to paper) with SU White craft ink. Once you do this you need to set it aside to dry for a few minutes but it will give your paper a frosted look.
Supplies~
Paper~SU-Night of Navy, Whisper White
Stamps~SU-Sleigh Bells Ring
Ink~SU-Night of Navy, White (craft), Real Read (marker)
Other~SU-Dimensionals, Ranger-Stickles, Jo-Ann's-Ribbon
Chocolate Treats~
 The Chocolates are Hershey Nuggets with a stamped mailing label wrapped around them. Sorry the colors look a little off in this picture, I'm not sure why. On the mailing labels the red berries almost look pink but IRL they are red. To color in the berries I used a Q-tip and picked up ink from the ink pad. The tip of the Q-tip is just the right size for doing this.
Supplies~
Paper~Walmart-Mailing Labels
Stamps~SU-Sleigh Bells Ring
Ink~SU-Handsome Hunter, Real Red
Other~SU-Small Celo Bag, Walmart-Hershey Nuggets, Q-tips, Ribbon & Crinkle Paper
Thank you so much for stopping by & I hope you enjoyed looking at some of the Sleigh Bells Ring designs!
I hope you all have a wonderful day!!
Smiles!
Heidi
For the class we made a card with a matching envy, a gift bag with matching tissue paper, a little chocolate treat bag & a glass Christmas ornament. But I am going to be saving the Christmas ornament for a different post so today I will be sharing the card, gift bag & treat bag with you.
The Card~
 The images were stamped with versa mark ink unto vellum & then I used gold EP & added some color with markers on the backside of the vellum. I really like the look when you color on the backside of the vellum, it gives a much softer look. For a touch of sparkle to the front I added some dazzling diamond glitter with a 2-way glue pen.
Supplies~
Paper~SU-Hunter Green, Real Red, Whisper White, Vellum
Stamps~SU-Sleigh Bells Ring
Ink~SU-Versa Mark, Hunter Green (pad & marker), Real Red (marker), Chocolate Chip (marker)
Other~SU-Gold Brads, Dimensionals, My Stash-Red Ribbon
The Gift Bag~
 For the background piece I used the images from the Sleigh Bells Ring set & Night of Navy ink. I stamped off twice to get the really faded look. Also on the Night of Navy CS I inked the edges (direct ink to paper) with SU White craft ink. Once you do this you need to set it aside to dry for a few minutes but it will give your paper a frosted look.
Supplies~
Paper~SU-Night of Navy, Whisper White
Stamps~SU-Sleigh Bells Ring
Ink~SU-Night of Navy, White (craft), Real Read (marker)
Other~SU-Dimensionals, Ranger-Stickles, Jo-Ann's-Ribbon
Chocolate Treats~
 The Chocolates are Hershey Nuggets with a stamped mailing label wrapped around them. Sorry the colors look a little off in this picture, I'm not sure why. On the mailing labels the red berries almost look pink but IRL they are red. To color in the berries I used a Q-tip and picked up ink from the ink pad. The tip of the Q-tip is just the right size for doing this.
Supplies~
Paper~Walmart-Mailing Labels
Stamps~SU-Sleigh Bells Ring
Ink~SU-Handsome Hunter, Real Red
Other~SU-Small Celo Bag, Walmart-Hershey Nuggets, Q-tips, Ribbon & Crinkle Paper
Thank you so much for stopping by & I hope you enjoyed looking at some of the Sleigh Bells Ring designs!
I hope you all have a wonderful day!!
Smiles!
Heidi
Subscribe to:
Posts (Atom)