Thursday, September 30, 2010

Spellbinders Layout - On Top of the World

Hello! Today, I have a scrapbook layout to share with you using Spellbinders™ die templates. This is a very simple layout but I didn't want to do anything that would overpower the photo. This past summer my oldest son went on a mission trip with our church and a friend took this picture of him. I love this picture!! To create the large square diecut I used the NEW LF-126 Grand Squares die #7 and the Grand Calibur™ from Spellbinders™. I inked the edges of the large square diecut and then I stamped a flourish image from the My Mind's Eye "Boy" Stamp Set. Then I added a diecut. To create the diecut I used S4-300 Heraldry die templates from Spellbinders™. I used black cardstock and then inked over with silver metallic ink.
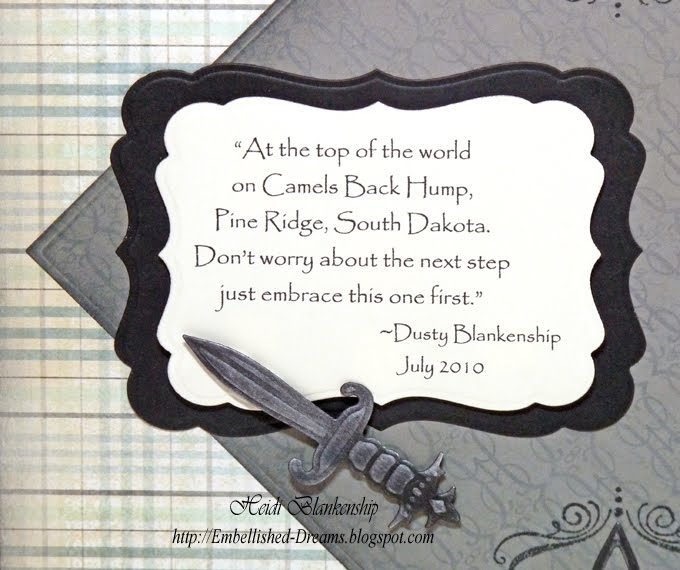
I asked Dusty to write a little something about the photo and then I typed it up and used S5-025 Labels Seventeen dies #4, #5 to cut/emboss the diecut shapes. The dagger is also from the S4-300 Heraldry die templates set.To create the crest I used one of the die templates from S4-300 Heraldry. I used ivory cardstock, inked it with black and then silver. I added 3D Foam Squares to the crest to add a little dimension. Supplies:
Stamps: My Mind's Eye Portobella Road Boy Stamp Set
Paper: My Mind's Eye Portobella Road Buddies, Family
Ink: Tsukineko Memento Tuxedo Black, Encore Metallic Silver
Accessories: SpellbindersGrand Calibur™, LF-126 Grand Squares die #7, S4-300 Heraldry, S5-025 Labels Seventeen dies #4, #5; SCRAPBOOK ADHESIVES By 3L™ Crafty Power Tape, 3D Foam Squares

Thanks for stopping by today! I hope you have a wonderful day!!

Hugs & Smiles,
Heidi

Wednesday, September 29, 2010

JustRite Stampers - A Beautiful Story Sympathy Card

Hello! I am sorry for neglecting my blog the past few days!! I have been sooooo busy getting class kits ready for the past several days and getting ready for my trip to Topeka, Kansas. I was invited to be a VIP Guest at the 2010 Memory Expo!! While I am there I will be speaking, teaching classes, doing make-n-takes and demoing. I am very excited and best of all I will get to see my dear sweet friend Karen Taylor!! I am leaving in the morning and still need to pack--yikes! It will be a miracle if I can fit everything in my bags---LOL!!

For my blog post today I have a sympathy card to share with you using JustRite Stamps and Spellbinders™ die templates.It seems like I never have sympathy cards when I need them. Sympathy cards are something I don't really like to make but need. To start I stamped one of the images from the Thinking of You stamp set from JustRite Stampers with Rich Cocoa Ink onto white cardstock.Next I colored the image with Copic markers. Then I used the S4-112 Classic Ovals Small die #5 to cut/emboss an oval.After I created the diecut I inked the edges with Shabby Shutters Distress Ink.I also created two more diecuts to use for mats. I used the S4-251 Big Scalloped Ovals Large die # 5, S5-025 Labels Seventeen die # 6 from Spellbinders™. I added a few tiny pearls to the Labels Seventeen diecut.For a finishing touch I added some ribbon.

Supplies
Stamps: JustRite Stampers JB-08740 Thinking of You stamp set, JB-08119 Wood Stamper Oval 2-1/4'' x 3-1/16''
Dies & Punches: Spellbinders™ Grand Calibur™, S4-112 Classic Ovals Small die #5, S4-251 Big Scalloped Ovals Large die # 5, S5-025 Labels Seventeen die # 6
Paper: Shabby Green Door; Neenah Solar White
Ink: Tsukineko Memento Rich Cocoa; Ranger Shabby Shutters Distress Ink; Copic Markers E0000, E000, R81, G40, G24
Accessories: Joann's Ribbon, Pearls; SCRAPBOOK ADHESIVES By 3L™ Crafty Power Tape, 3D Foam Squares

Thank you for stopping by today!! I have a blog post scheduled for tomorrow but then I probably won't be posting again until after I am back home. I hope you have a Wonderful Day and Happy Creating!!

Hugs & Smiles,
Heidi

Wednesday, September 22, 2010

JustRite 12 Weeks of Christmas Blog Hop #3

Welcome to JustRite Stampers’ newest Wednesday feature, 12 Weeks of Christmas Blog Hops #3! Every Wednesday up until Thanksgiving some of your favorite designers will be joining some of the JustRite design team for a series of Christmas blog hops, showcasing JustRite’s entire Christmas Collection of stamps! So mark your calendars for Wednesdays at 9am Central for great Christmas gift, card & project ideas, starting at the JustRite Inspiration blog!For today's Blog Hop I created a Christmas card using JB-09780 Hearts Come Home stamp set from JustRite Stampers. The JB-09780 Hearts Come Home stamp set includes 6 Designer Centers and 6 Interchangeable Borders and fits the JB-09508 Clear 2'' Square Stamper. I started by stamping the center image two times on to white cardstock using Tuxedo Black ink.For the first image I colored the poinsettia with Copic Markers and then hand cut the image. On the second image I colored the pine, holly, berries and outer edges of the poinsettia with Copic markers. I only colored the outer edges of the poinsettia because I wanted to layer the first poinsettia that I cut out on top. Next I stamped the Border with a Merry Christmas sentiment on to raspberry cardstock using Gold Pigment Ink and then I added gold embossing powder and heat set with a heat tool.I used the Grand Calibur™ from Spellbinders™ and S4-128 Classic Squares Small die #3 to cut/emboss the center image. Then I used S4-295 Lacey Squares die #3 to make the square diecut. I inked the edges of the mat and two diecuts with Brushed Corduroy Distress Ink. Next I used a paint brush and Gem-Tac glue from Beacon Adhesives to add glue to the edges and then coated then with clear chunky glitter.Here is a close-up. I also used S4-301 Labels Sixteen die #3 to create the fancy raspberry colored diecut. I layered all of the piece and used 3D Foam Squares from SCRAPBOOK ADHESIVES By 3L™ to add a little dimension. I also added some pink rhinestones.On the raspberry colored mat I used the Flourish Impressabilites™ from Spellbinders™ and then lightly rubbed a gold ink pad over the embossed areas.I also added a bow and poinsettia with rhinestones. I added stickles to the poinsettia and holly for a little sparkle.Supplies
Stamps: JustRite Stampers JB-09780 Hearts Come Home, JB-09508 Clear 2'' Square Stamper
Dies & Punches: Spellbinders™ Grand Calibur™, S4-128 Classic Squares Small die #3, S4-301 Labels Sixteen die #3, S4-295 Lacey Squares die #3, I2-1009 Flourish Impressabilities™
Paper: My Mind's Eye Life Stories; Neenah Solar White; WolrdWin Raspberry
Ink: Tsukineko Memento Tuxedo Black; Ranger Brushed Corduroy Distress Ink; Clearsnap Gold Pigment Ink; Copic Markers R81, R29, R39, Y38, G14, G17, YG00
Accessories: Prima Flowers; Swirly Rhinestone; My Mind's Eye Lush Pink Rhinestones; SCRAPBOOK ADHESIVES By 3L™ EZ Runner, 3D Foam Squares; Joann's Ribbon, Clear Chunky Glitter; Beacon Adhesives Gem-Tac; Ranger Cotton Candy, Gold Stickles

Please visit these designers’ blogs to see what fabulous Christmas projects they have for you on the hop today!

Thank you so much for stopping by today and I hope you enjoy the Blog Hop!!

Hugs & Smiles,
Heidi

Tuesday, September 21, 2010

JustRite Stampers - Give Thanks Nested Frames - Altered Autumn Candy Tin

Good morning! Today, I am sharing a project I created with the New Release, Give Thanks Nested Frames from JustRite Stampers. The Give Thanks Nested Frames stamp set includes 3 Large Frames, 3 Small Frames, 3 Small Phrases and fits the Clear Horizontal Stampers.For my project I altered a candy tin using the Give Thanks Nested Frames stamp set, Copic markers, diecuts and embellishments with some sparkle. Here is a quick picture of the candy tin before I altered it. To start I stamped the image of the frames and sentiment onto ivory paper with Rich Cocoa Memento Ink. Then I colored the leaves and acorns with Copic markers.To create the diecut I used S5-025 Labels Seventeen die #5 from Spellbinders™. Once I had the shape cut/embossed then I airbrushed it with Copic markers.Here is a close-up of the Give Thanks Nested Frames. I love this sentiment!I also create a flower using the S4-192 Blossom dies #2, #3. I used old book print for the paper, added a small brad in the center and scrunched the flower to shape it. Then I airbrushed the flower with Copic markers, added rhinestones in the center and edged it with Gold Stickles. I also added a leaf, berries, ribbon and swirly rhinestones. I applied Gold Stickles to give it the added sparkle. For a finishing touch I added ivory lace around the top of the lid.

Supplies
Stamps: JustRite Stampers JB-09240 Give Thanks Nested Frames, JB-09520 Clear Horizontal Stampers-2 pack set
Dies & Punches: SpellbindersGrand Calibur™, S5-025 Labels Seventeen die #5, S4-192 Blossom dies #2, #3, S4-121 Doodle Parts
Paper: Neenah Cream; The Paper Company Kraft, Peach; Old Book Print
Ink: Tsukineko Memento Rich Cocoa; Ranger Brushed Corduroy Distress Ink; Copic Markers Y38, YR04, YR24, R39, R81, G24, YG63, E15, E27
Accessories: Tattered Angels Iridescent Gold Glimmer Mist; Candy Tin; SCRAPBOOK ADHESIVES By 3L™ Crafty Power Tape, 3D Foam Squares; Ranger Gold Stickles; Joann's Brown Ribbon, Rhinestones, Leaf, Berries, Lace

Please be sure to visit the JustRite Inspiration Blog and some of the JustRite DT Members listed below who have been busy creating Fabulous Fall creations to share with you.


Thank you so much for stopping by today! I hope you have a wonderful day!!

Hugs & Smiles,
Heidi

Monday, September 20, 2010

Crafty Secrets DT challenge Sept - Halloween

Good morning! It's time again for another fantastic Crafty Secrets monthly challenge. For September our challenge was to create something for Halloween using some of the newer products from Crafty Secrets.I created a wall hanging using the Costume Cuties stamp set and Halloween Greetings Creative Scraps from Crafty Secrets.I started with a raw piece of wood. I found these at Joann Fabric for under a $1 and my husband drilled a couple of holes so I could create a wall hanging. I misted the piece of wood with several colors of Glimmer Mist--Twilight, Artic Blue, Haunted Shadow, Raven, Black Gold from Tattered Angels. I let the Glimmer Mist sit on the wood for a couple of minutes and then I took a paper towel and blotted off the excess. I used a heat tool to heat set and speed up the drying time. Next I used acrylic paint and a sponge brush to add black paint to the stamps and then I stamped directly on to the wood. If you use paints with your stamps be sure to wash them off right away so the paint doesn't dry in all the little spaces. I have found using a tooth brush is great for cleaning and getting into all of the tiny spaces on stamp images.Let the paint dry--this should only take a few minutes.Next I added a little color to the dancing couple using Smooch by Clearsnap.I created a perfectly matching ruffle using crepe paper and glimmer mist. I used the same colors as mentioned above to color the white crepe paper. Then I used Crafty Power Tape from SCRAPBOOK ADHESIVES By 3L™ to adhere the crepe paper.Here is the front of the wall hanging once I had the ruffle done. To add the sentiment I used a stamp from the Costume Cuties stamp set with gold ink and gold embossing powder. Then I used S4-301 Labels Sixteen die #3 die template to create the label diecut and added Glimmer Mist and Smooch.I used black 3D Foam Squares from SCRAPBOOK ADHESIVES By 3L™ to add a little dimension to the wall hanging. The wood block "Beware" is from the Halloween Greetings Creative Scraps from Crafty Secrets. I used S4-277 Nested Bats 3 smallest bats to create the bat diecuts.To create the moon I used a stamp from the Costume Cuties stamp set and the S4-116 Standard Circles Small die #3. Then I added Candlelight Glimmer Mist and Stickles.Here's a few close-up pictures.

Supplies~
Crafty Secrets: Costume Cuties stamp set, Halloween Greetings Creative Scraps
Paper: WorldWin Deep Yellow; Crepe Paper White
Ink: Tsukineko Memento Tuxedo Black; Clearsnap Color Box Gold Pigment Ink
Accessories: Spellbinders™: Grand Calibur™, S4-116 Standard Circles Small die #3, S4-301 Labels Sixteen die #3, S4-277 Nested Bats 3 smallest bats; Tattered Angels Glimmer Mist Twilight, Artic Blue, Haunted Shadow, Raven, Black Gold, Candlelight; Ranger Stickles Orange Peel, Black; Clearsnap Smooch Sugarberry, Green Apple, Pumpkin; My Mind's Eye Lush Green Rhinestones; Sakura Black Glaze Pen; SCRAPBOOK ADHESIVES By 3L™ Crafty Power Tape, Black 3D Foam Squares; Folk Art Pure Black Acrylic Paint; Gold Embossing Powder, Sponge Brush, Purple Ribbon, Wire, Heat Tool

Please be sure to visit the Crafty Secrets Blog and all of the Crafty Secrets DT Members. I can't wait to see what they have all been busy creating!!


Thank you so much for stopping by today and I hope you have a Wonderful Day!!

Hugs & Smiles,
Heidi

LinkWithin

Related Posts Plugin for WordPress, Blogger...