Friday, October 31, 2014

The Stamp Simply Ribbon Store - Season's Greetings Christmas Card

Hello everyone and Happy Halloween!  Today, is my day to post for The Stamp Simply Ribbon Store and I have a quick and easy Christmas card to share with you.  I used a few stamps to create my own custom background.


Here is the card that I designed.  I used white cardstock for the base and then added a piece of pattern paper from the BoBunny Candy Cane Lane 6 x 6 Collection for a layer in the background.  Next I used stamps from CR-02144 Bokeh Time Clear Stamps and CL-02053 JustRite Small Cling - Snowflakes along with Memento Teal Zeal andVersa Magic Sea Breeze inks to create the background.  I know these are non-traditional Christmas colors but I just love the aqua blues at Christmas.


I used CR-02133 JustRite Clear Stamp - Extra Grand Holiday Sentiments and  Teal Zeal ink to stamp the sentiment.  Then I used S6-015 Snowflakes View die from Spellbinders Paper Arts® to create the die cut.  For a little added sparkle I used the Zig Wink of Stella Clear Glitter Brush Pen on the sentiment and around the edges of the frame.


Here is a close up.  Love all the sparkle!


I also added a little sparkle on the star images.


To finish off the card I added May Arts 1.5" Sheer Wrinkled Edge-White and created a bow.  Then I added a KaiserCraft Crystal Sparklets to the center of the bow.

Using your stamps to create backgrounds can be a lot of fun!

As always you can click on all the photos to enlarge them and all of the supplies are listed below with links.

Also, there is a fantastic sale going on right now!!

Treat Box Special
Purchase a Treat Box –  It will be filled with $100 worth of product (retail value) for only $50.00!!
Click HERE to find of all of the details.


Please be sure to check out The Stamp Simply Ribbon Store for all of the fantastic paper crafting products and the Blog for inspiration from the Design Team.

Thanks so much for stopping by today! 

Hugs & Smiles,
Heidi


Supplies
Stamps:  JustRite® Papercraft CR-02144 Bokeh Time Clear StampsCR-02133 JustRite Clear Stamp - Extra Grand Holiday SentimentsCL-02053 JustRite Small Cling - Snowflakes-The Stamp Simply Ribbon Store
Paper:  BoBunny Candy Cane Lane 6 x 6 Collection-The Stamp Simply Ribbon Store; Cardstock-White
Ink:  ImagineCrafts/Tsukineko Memento Teal Zeal, Versa Magic Sea Breeze
Dies:  Spellbinders Paper Arts® S6-015 Snowflakes View
NOTE:  You can also find Spellbinders® products at The Stamp Simply Ribbon Store
Ribbon:  May Arts 1.5" Sheer Wrinkled Edge-White-The Stamp Simply Ribbon Store;
Accessories:  Zig Wink of Stella Clear Glitter Brush Pen, KaiserCraft Crystal Sparklets-The Stamp Simply Ribbon Store,  Scrapbook Adhesives by 3L® 3D Foam SquaresEZ Runner® Permanent Strips-Refillable Dispenser 49'
NOTE:  You can also find Scrapbook Adhesives by 3L® products at The Stamp Simply Ribbon Store

Wednesday, October 29, 2014

ButterBeeScraps - Beautiful Dangle Earrings

Hello everyone!  Today, I have a couple of ButterBeeScraps jewelry projects to share with you.  I designed a couple pairs of earrings using some of the new products.


Here is the first pair of earrings that I designed.  I am so happy with how these turned out!  The bronze and champagne pearls look so beautiful together.  


Here is a close up of the gorgeous bead caps.


I used Champagne Pearls, Bronze Ball End Head Pins, and Bronze Chain (Item #CH783-B) to create the dangles.  Then I added the Bronze Filigree Bead Caps (Item #CAP629-B)Clear Rhinestone Rondelle Spacer Beads - 8mm (Item #BD008-B/CL), and another Champagne Pearl.


I used the Bronze Ball End Head Pins to create the french earring hooks.


This is the second pair of earrings that I designed.  I used the a lot of the same supplies but on these earrings I used the smaller Clear Rhinestone Rondelle Spacer Beads - 6mm (Item #BD006-B/CL) and the two different styles of pink acrylic flower bead caps.  I also used some tiny pink crystal beads.


I had a lot of fun designing these earrings.  If you like to create jewelry or use metal embellishments, charms and crystals in your projects please check out ButterBeeScraps.  

Monique is having a BLOW OUT SALE on select items in the store with a savings up to 60% OFF while supplies last!  So be sure to check it out!  You can click HERE to visit the store. 

Thanks so much for stopping by today!

Hugs & Smiles,
Heidi 


Supplies
ButterBeeScraps:  Clear Rhinestone Rondelle Spacer Beads - 8mm (Item #BD008-B/CL)--bronze/pearl earrings, Clear Rhinestone Rondelle Spacer Beads - 6mm (Item #BD006-B/CL)--bronze/pink earrings, Bronze Filigree Bead Caps (Item #CAP629-B)Bronze Filigree Bead Caps (Item #CAP052-B)Bronze Ball End Head PinsBronze Chain (Item #CH783-B), Pink Acrylic Flower Bead Caps
Other Supplies:  Larger Pink Flower Bead Cap, Pink Crystals, Champagne Pearls

Friday, October 24, 2014

The Stamp Simply Ribbon Store - Breast Cancer Awareness Week

Hello everyone!  Today, is my day to post for The Stamp Simply Ribbon Store and this week over at The Stamp Simply Ribbon Store Blog they are honoring 
Breast Cancer Awareness by showing PINK cards ALL week! 


Here is the card that I designed using mostly pink and a touch of white.  I used the AG-02108 A Flower For Your Thoughts Clear Stamps for the sentiment and to create a cluster of flowers.  For the flowers I used Rose Bud and Bamboo Leaves Memento inks.  To achieve the lighter colors I stamped the image a second time.  Then I used S4-418 Labels Thirty-six to create the die cut.  I inked the edges of the die with the Rose Bud ink and I also used Copic Marker YG69 Pea Green to add a little bit of grass at the bottom of the leaves.  


Here is a close up.  I created two more die cuts using S4-425 Elegant Ovals and S5-131 A2 Matting Basics A.  I used 3D Foam Squares in between the top two layers.  Then I I added some flowers from the Petaloo Botanica Collection Pink Minis and Kaisercraft Fairy Floss Pink Mini Paper Blooms.  I also added a few Melissa Frances White Pearls.


As always you can click on all the photos to enlarge them and all of the supplies are listed below with links.

Please be sure to check out The Stamp Simply Ribbon Store for all of the fantastic paper crafting products and the Blog for inspiration from the Design Team.

Thanks so much for stopping by today! 

Hugs & Smiles,
Heidi


Supplies
Stamps:  JustRite® Papercraft AG-02108 A Flower For Your Thoughts Clear Stamps-The Stamp Simply Ribbon Store
Paper:  Cardstock White, Pink
Ink:  ImagineCrafts/Tsukineko Memento Rose Bud, Bamboo Leaves; Copic Marker YG69 Pea Green
Dies:  Spellbinders Paper Arts® S5-131 A2 Matting Basics A, S4-425 Elegant Ovals, S4-418 Labels Thirty-six
NOTE:  You can also find Spellbinders® products at The Stamp Simply Ribbon Store
Accessories:  Melissa Frances White Pearls, Petaloo Botanica Collection Pink Minis, Kaisercraft Fairy Floss Pink Mini Paper Blooms-The Stamp Simply Ribbon Store,  Scrapbook Adhesives by 3L® 3D Foam SquaresEZ Runner® Permanent Strips-Refillable Dispenser 49'
NOTE:  You can also find Scrapbook Adhesives by 3L® products at The Stamp Simply Ribbon Store

Tuesday, October 21, 2014

JustRite Papercraft - Tutorial Tuesday - Christmas Card Chalkboard Tutorial

Hello everyone!  It's time for another Tuesday Tutorial with JustRite® Papercraft.  For this weeks tutorial I share how to create some fun, quick and easy Christmas cards with the Chalkboard Technique.  The chalkboard look is so popular right now and with just a few supplies you can very easily achieve that look with your papercrafts.


Here is a look at the three cards I designed.  


To see more pictures and find out all of the details you can click HERE to hop on over to the JustRite® Inspiration Blog.  You can also click HERE to see the video.

~~~~~~~~~~~~~~~~~~~~~~~~~~~~~~~~~~~~~~~~~~~~~~~~~~~~~~~~~~~~~~~~~~~~~~~~~

GIVEAWAY ON THE JUSTRITE® INSPIRATION BLOG!!

For this week's Tutorial Tuesday Giveaway one lucky winner will receive 
a $25.00 Gift Card to the JustRite Store. 


Simply tell us if you have used the Chalkboard Technique yet to create a project? 
**Leave your comment on the JustRite Blog**

Remember that you can double your chances of winning by leaving comments on the JustRite Blog and on Heidi's Video. Don't forget to show Heidi a little love when you watch her video - give her a thumbs up.

~~~~~~~~~~~~~~~~~~~~~~~~~~~~~~~~~~~~~~~~~~~~~~~~~~~~~~~~~~~~~~~~~~~~~~~~~


Thank you so much for stopping by today!

Hugs & Smiles,
Heidi


Saturday, October 18, 2014

My Favorite Things - Product Review - MIX-ables STENCILS

Hello everyone!  Today, I am very excited to share a product review with you featuring My Favorite Things (MFT) MIX-ables STENCILS!  Not too long ago My Favorite Things contacted me to see if I would do a product review and I happily said yes.


I was able to pick out some of the MIX-ables STENCILS that I wanted to play with so the past couple of days I have been doing just that--getting inky and breaking out the Gansai Tambi 36 Colours Set Watercolors.  


It's  always a lot of fun to play with new products and I really enjoyed working with the stencils.  The stencils are 6 x 6 which I love.  This is a perfect size for A2 cards and all of the square cards.  Also several of the stencils are designed with a continuous pattern so if you wanted to stencil a larger area you could carefully move the stencil and line it up perfectly.

I have three cards to share with you today using MIX-ables STENCILS LJD Wildflowers Mini Chicken WireLJD Spring Flowers.


Here is the first card I designed using the MIX-ables STENCILS LJD Wildflowers.  I used painters tape to mark off part of the stencil and then I used VersaMark ink directly on top of the stencil to get the images of the flowers.  Then I added white embossing powder and heat set.


Here you can see the embossing before I added the watercolor.  You can also see the stencil in the background with the painters tape.


Here is a close up of the watercolor.  I used Gansai Tambi 36 Colours Set Watercolors.  I added a few blue sequins and then I stamped a sentiment using CS-25 More Essential Sentiments stamp set.


I used the MIX-ables STENCILS  Mini Chicken Wire and Gansai Tambi 36 Colours Set Watercolors to create a fun watercolor background for this Halloween card.


Here you can see a close up of the background.  I used several of the watercolors to create the look of night time and then I laid the  MIX-ables STENCILS Mini Chicken Wire on top of the watercolor paper and lightly misted with water.  The water pools up under the stencil creating this fun effect.  I left the stencil in place until the paper and paint were dry.  Once the background was dry I used some of the stamps from the LJD-Primitive Pumpkins Stamp Set to stamp the stars and sentiment.


I also used the Die-namics LJD Primitive Pumpkin Trio and the pumpkin stamps from the LJD-Primitive Pumpkins Stamp Set to create this fun little set of pumpkins.  I used  Rich Cocoa, Tangelo, Peanut Brittle, Potters Clay, Olive Grove Momento inks for the pumpkins.  Then I added orange shimmer for a layered mat and a black card base with a black mess bow.  I also used my Zig Wink of Stella Clear Glitter Brush Pen to add a little sparkle to the stars and pumpkins.


For my third and final card I just did basic stenciling but I used three different colors of ink--Rose Bud, Tangelo, and Cantaloupe Memento inks.  I used the MIX-ables STENCILS LJD Spring Flowers to create the background.


Here is a look at the stencil with the inks before I removed it from the paper.


I added some orange sheer ribbon to create a bow and then some WOC Flowers.  I also added a few pearls at the top of the card.  I used one of the sentiments from the CS-25 More Essential Sentiments stamp set.  I added the background to a pink card base.

I had a lot of fun working with the stencils and I wanted to add they clean up very nicely too!  I will be sharing a couple more projects using the MFT Stamps MIX-ables STENCILS next week.  I hope you enjoyed the projects and the product review--I give the stencils a big thumbs up! :) 

Thanks so much for stopping by today and I hope everyone has a wonderful weekend!!

Hugs & Smiles,
Heidi


Supplies
Paper:  Strathmore Watercolor Paper, Cardstock-White, Orange Shimmer, Black, Pink
Ink/Paint/Marker:  ImagineCrafts/Tsukineko VersaMark,Memento Tuxedo Black, Rich Cocoa, Tangelo, Peanut Brittle, Potters Clay, Olive Grove, Cantaloupe, Rose Bud; Gansai Tambi 36 Colours Set Watercolors; Zig Wink of Stella Clear Glitter Brush Pen
Accessories:  Blue Sequins, White Embossing Powder, Black Mesh Ribbon, Orange Sheer Ribbon, WOC Flowers, Pearls, Scrapbook Adhesives by 3L™ 3D Foam Squares, E-Z Runner® Permanent Strips-Refillable Dispenser 49'

Friday, October 17, 2014

The Stamp Simply Ribbon Store - Let It Snow Christmas Card

Hello everyone!  Today, is my day to post for The Stamp Simply Ribbon Store and have a darling Christmas card to share with you.


The colors are non-traditional for Christmas but I love a touch of pink at Christmas.  The pretty Bokeh style paper is from the BoBunny Candy Cane Lane 6 x 6 Collection.  I love the papers in this collection!  They are fun with sweet images and non-traditional colors.


I thought this cute little snowman image from the JustRite® Papercraft CR-02026 Appliqué Christmas Labels One Clear Stamps would be great with the papers.  I stamped the image on to white cardstock using Memento Rich Cocoa Ink and then I colored the image with  Spectrum Noir™ Markers (listed below).  Then I stamped the hate, colored and fussy cut it.  I used 3D Foam Squares to pop the hat up.  Once I had the image colored I used S4-161 Labels One die template from  Spellbinders Paper Arts® to cut/emboss the label shape.  I also used some blue cardstock and S4-375 Scalloped Labels One die template to create a second label shape for layering.  I stamped the sentiment in the bottom corner.  I used  3D Foam Squares from  Scrapbook Adhesives by 3L® to layer the labels.  I wanted to add a little bit of sparkle to the snowman so I used my Zig Wink of Stella Clear Glitter Brush Pen on his cheeks, body, hat and holly.


In this picture you can see all of the shimmery sparkle from the Zig Wink of Stella Clear Glitter Brush Pen.  Love it!


To finish off the card I added a bow using May Arts Pink Sheer Ribbon and a few Webster's Pages Party Time Sequins.

 As always you can click on all the photos to enlarge them and all of the supplies are listed below with links.

Please be sure to check out The Stamp Simply Ribbon Store for all of the fantastic paper crafting products and the Blog for inspiration from the Design Team.

Thanks so much for stopping by today! 

Hugs & Smiles,
Heidi


Supplies
Stamps:  JustRite® Papercraft CR-02026 Appliqué Christmas Labels One Clear Stamps-The Stamp Simply Ribbon Store
Paper:  BoBunny Candy Cane Lane 6 x 6 Collection-The Stamp Simply Ribbon Store; Cardstock-White, Snow Cone, Pink
Ink/Markers:  ImagineCrafts/Tsukineko Memento Rich Cocoa Ink, Zig Wink of Stella Clear Glitter Brush Pen-The Stamp Simply Ribbon Store; Spectrum Noir™ Markers IB1, IB2, BT1, GG1, GG2, GG3, EB2, EB3, PP1, PP2, LG2 LG3, Blender
Dies:  Spellbinders Paper Arts® S4-161 Labels One, S4-375 Scalloped Labels One
NOTE:  You can also find Spellbinders® products at The Stamp Simply Ribbon Store
Ribbon:  May Arts Pink Sheer Ribbon-The Stamp Simply Ribbon Store
Accessories:  Webster's Pages Party Time Sequins, Tombow Mono Multi Liquid Glue-The Stamp Simply Ribbon Store,  Scrapbook Adhesives by 3L® 3D Foam SquaresEZ Runner® Permanent Strips-Refillable Dispenser 49'
NOTE:  You can also find Scrapbook Adhesives by 3L® products at The Stamp Simply Ribbon Store

Wednesday, October 15, 2014

Mixed Media Happiness Canvas and Fiskar Fuse

Hello everyone!  Today, I have something new, fun and a little different to share with you.  I know for a lot of crafters we have those moments when we see something new or new to us and we are very intrigued with the products and how they work.  Well, for me it's the Fiskars® Fuse Creativity System Die Cutting Machine and the die templates.  To be honest it was actually my husband who asked me if I had heard of these new dies LOL.  He stopped in at Joann's to pick something up for me (yes he is very sweet and shops at the craft stores for me!) and while he was there he saw the new machine and die templates.  I started looking around online and I loved the concept of these dies.  You can do five different techniques with the dies--Die-cut + Letterpress, Die-cut + Press Only, Die-cut Only, Letterpress Only, Press Only.  You can click HERE to see how it works.  Some of the die templates will cut thicker materials such as chipboard and other die templates cut more intricate designs and work best with cardstock.  You can also get expansion packs for more letterpress options.  
So are you ready to see a project?  I altered a 8 x 10 canvas and I used the Fiskar Fuse Medium Design Set 101910 - Mirror and Fiskar Fuse Medium Expansion Pack 101910 - Mirror to create the key plate on the canvas.


I just love how the canvas turned out and I love the key plate.  I took a few pictures, but not too many while I was creating.  I just wanted to have fun getting inky lol.


This is how the canvas started out.  I prepped the canvas with some white gesso and then I laid down some color with the Distress Sprays Stains.  I started out using Peeled Paint, Peacock Feathers.


After putting the first couple of colors on the canvas I added some torn pieces from old book pages.  Then I used texture paste and a few stencils to the background.  Here is a close up of the textured doily.  I just kept added sprays, paints and inks as I was going.


Here you can also see some of the dot texture and splatters from the Distress Spray Stains that I flicked on with a paint brush.


Here is a close up of the key plate.  I love the vintage look and feel I was able to achieve using a few different products.  


To create the key plate I cut three shapes using black fun foam and on one of the shapes I did the die cut and press only technique.  Then I created another die cut using chipboard.  For this piece I did the die cut and letterpress technique.


Next I cut the key holes from the two die cuts that had been pressed.  I used a craft knife for the chipboard and it was actually easier to use a scissors for the fun foam.


For the top piece I used some VersaMark ink and added Frantage Aged Ivory Embossing Enamel from Stampendous and heat set.  Then inked up the letterpress plate with Jet Black StazOn ink and ran the chipboard piece through the machine again.  Next I sanded and distressed the chipboard piece and once that was done I glued all of the pieces together.  I also added more of the embossing enamel around the outer edges and used a PITT Big Brush Pen Black 199 around the edges.  If you would like to see more of the Fiskar Fuse die templates and machine in action you can click HERE--scroll down just a bit and you will see a few different videos you can click on. 


I also used  Vintage Photo and Brushed Pewter Distress Spray Stain and here you can see a little of the brown color.  The brushed pewter is really pretty and leaves a little bit of a shimmer.  I also dry brushed over some of the textured areas with white acrylic paint to make the texture pop a little more.


I think this is one of my favorite parts about the canvas--love this little bird!  This is from an older Prima stencil.  I used some of the Distress Spray Stains and a paint brush to apply the color.  


After I added the color to the bird and twig used both the Gelato-Squid Ink and PITT Big Brush Pen Black 199 to edge the canvas, word blocks, around the key plate and the image of the bird.


I'm not really sure what I am going to do with the canvas--but I had SO MUCH FUN creating it!!  Maybe I will put it in my store.  What do you think?  Yes, I am still working on getting the store up and going--hopefully soon!! :)

Thank you so much for stopping by today!

Hugs & Smiles,
Heidi


Supplies
8 x 10 Canvas
Fiskars® Fuse Creativity System Die Cutting Machine, Fiskar Fuse Medium Design Set 101910 - Mirror, Fiskar Fuse Medium Expansion Pack 101910 - Mirror
Ranger:  Tim Holtz Distress Spray Stain-Peeled Paint, Peacock Feathers, Vintage Photo, Brushed Pewter; Distress Inks-Antique Linen, Pumice Stone
ImagineCrafts/Tsukineko:  StazOn Jet Black Ink, VersaMark Ink
Faber-Castell:  Gelato-Squid Ink; PITT Big Brush Pen Black 199
Stampendous: Frantage Aged Ivory Embossing Enamel
Plaid® Mod Podge® Matte
Krylon® Clear Satin Spray
Gesso, Texture Paste, Old book Pages, White Acrylic Paint, Stencils, Fun Foam, Chipboard

Friday, October 10, 2014

The Stamp Simply Ribbon Store - 12 Days of CAS Christmas - Merry & Bright G45 Card

Hello blogging friends!  Today, is my day to post for The Stamp Simply Ribbon Store and as part of the 12 Days of CAS Christmas I have one more CAS Christmas card to share with you.

The 12 Days of CAS Christmas is coming to an end but I hope you have enjoyed all of the Christmas projects from the Design Team and have been inspired to create your own CAS Christmas cards.


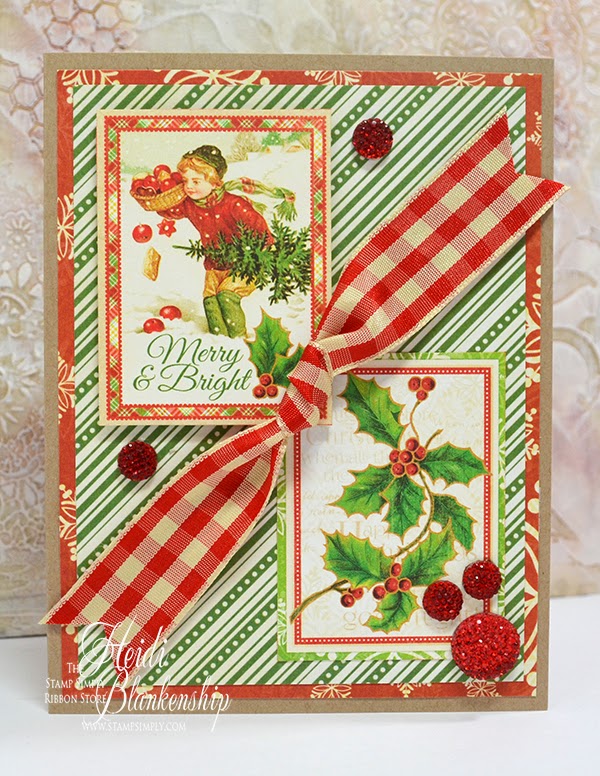
Here is the card that I designed using some of the fun and festive Graphic 45 Twas the Night Before Christmas 8 x 8 Paper Pad Collection and 6 x 6 Paper Pad Collection.  I always love all of the images in the Graphic 45 paper pads.  These are great for creating CAS cards--just a little bit of fussy cutting, some paper layer, a couple of embellishments and you have a beautiful card.


Here is a close up of the top image.  Both images are from the 8 x 8 paper pad and the pattern paper is from the 6 x 6 paper pad.  I used some 3D Foam Squares to pop up the image.  Then I added some May Arts 7/8" Gingham Red Ribbon and a few Kaisercraft Sparklets-Rouge.


Here is a close up with the bottom image and a few more Kaisercraft Sparklets-Rouge.  I think the Sparklets look like pretty holly berries.


To finish off the card I added all of the layers to a kraft cardstock base.  So CAS and quick and easy to make!

As always you can click on each of the pictures to enlarge them.

Please be sure to check out The Stamp Simply Ribbon Store for all of the fantastic paper crafting products and the Blog for inspiration from the Design Team with fantastic CAS Christmas Cards.

Thanks so much for stopping by today! 

Hugs & Smiles,

Heidi


Supplies
Paper:  Graphic 45 Twas the Night Before Christmas 8 x 8 Paper Pad Collection,  6 x 6 Paper Pad Collection-The Stamp Simply Ribbon Store; Cardstock-Kraft
Ribbon:  May Arts 7/8" Gingham Red Ribbon-The Stamp Simply Ribbon Store
Accessories:  Kaisercraft Sparklets-RougeThe Stamp Simply Ribbon StoreScrapbook Adhesives by 3L® 3D Foam SquaresEZ Runner® Permanent Strips-Refillable Dispenser 49'
NOTE:  You can also find Scrapbook Adhesives by 3L® products at The Stamp Simply Ribbon Store

LinkWithin

Related Posts Plugin for WordPress, Blogger...