Friday, July 31, 2015

The Stamp Simply Ribbon Store - Lots of Presents Merry Christmas Card

Hello blogging friends!  Today, is my day to post for The Stamp Simply Ribbon Store.  I have another Christmas card to share with you on this last day of July.  I can't believe it's July and I already have several Christmas cards made!  It will be nice to have some of those already done, especially once we get in to the busy holiday season.  


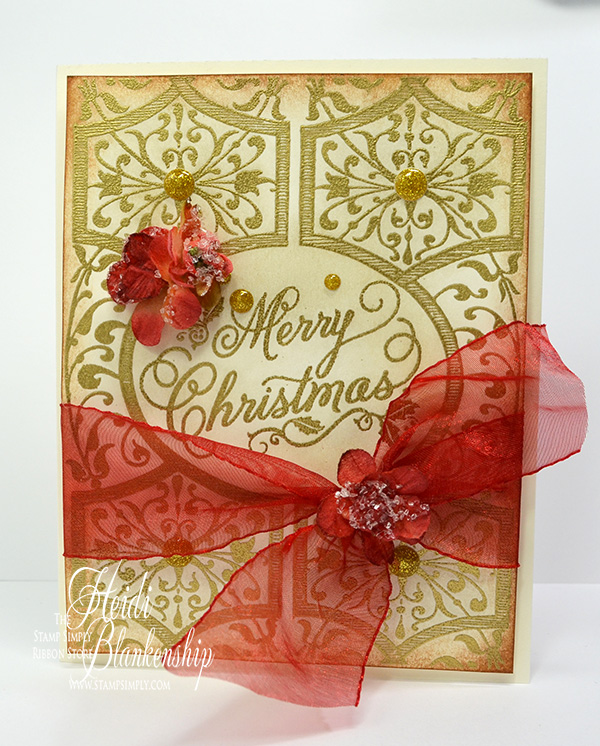
Here is the card that I designed using the  JustRite Papercraft - Peace and Joy Sentiments clear stamp set.  I used the images of the presents to create the border across the bottom of the card.  I used Memento Tuxedo Black Ink to stamp on to white cardstock.  Then I colored the images with Spectrum Noir Markers.  The coloring is very simple and easy to do on this card and you could use any type of marker.  Next I stamped the sentiment in the upper corner.


Here you can see a close up of the sentiment.  I used Glossy Accents to apply a few Sequins 5mm Multi for a little bit of sparkle on the card.


Here is a close up of the presents.  Like I said this is very quick and easy coloring and I think this would be a great card to make multiples of.


To finish off the card I added a blue mat and then added a red card base.  I used May Arts Red Sheer Ribbon to create a pretty and fluffy bow and I used Scrapbook Adhesives by 3L E-Z Runner to adhere the card.

Thank you so much for stopping by today! 


Please be sure to check out The Stamp Simply Ribbon Store for all of the fantastic paper crafting products and the Blog for inspiration from the Design Team.

I hope you have a wonderful weekend!

Hugs & Smiles,
Heidi


Supplies
Stamps:  JustRite Papercraft - Peace and Joy Sentiments
Paper:  Cardstock - White, Red, Blue
Ink/Markers:  Memento Tuxedo Black Ink, Spectrum Noir Markers
Ribbon:  May Arts Red Sheer Ribbon
Accessories:  Sequins 5mm Multi, Glossy Accents, Scrapbook Adhesives by 3L E-Z Runner

Thursday, July 30, 2015

ButterBeeScraps - Happy Birthday Card & Bonjour Card

Hello blogging friends!  Today, I have a couple of quick and easy cards to share with you.  I used several metal bits and pieces from ButterBeeScraps to embellish both of the cards.


The first card I designed is a birthday card.  The base of the card is white cardstock.  I used an embossing folder from We R Memory Keepers to emboss the doily pattern.  Then I lightly went over the embossed area with a white pigment ink pad to make the embossing pop.  I stamped the Happy Birthday sentiment from JustRite Papercraft in the upper corner.  Then I added some baby pink seam binding and created a bow.  To embellish the card I added the BRONZE METAL FILIGREE EMBELLISHMENT (#020-B) to create a border right above the seam binding.  Then I made a beaded dangle using  BRONZE BALL END HEAD PINSBRONZE FILIGREE BEAD CAPS (#CAP827-B)6X8MM CLEAR FACETED GLASS ABACUS BEADS,  BRONZE FILIGREE BEAD CAPS (#CAP052-B)CLEAR RHINESTONE AND BRONZE RONDELLE SPACER BEADS – 6MM (#BD006-B/CL), and a 4 mm clear bicone bead from my stash.  I used a Black Safety Pin to attach the beaded dangle to the bow.


Here is a close up of the metal filigree and the beaded dangle.


Here is the second card that I designed.  I just love how this card turned out and the simplicity of it!  The base of the card is Kraft cardstock.  Then I used an embossing folder from Sizzix to emboss the top of the card front.  I lightly went over the embossed area with Antique Linen ink.  Down on the bottom portion of the card I stamped a flourish, the Eiffel Tower, and the sentiment.  I inked the outer edges of the card with Antique Linen ink.  To embellish the card I added a BRONZE METAL FILIGREE EMBELLISHMENT (#683-B) and SMALL GLASS CLOCK CABOCHONS W/ BRONZE SETTINGS to the top of the card.  Then I added SS20 LIGHT COLORADO TOPAZ FLAT BACK GLASS RHINESTONESSS16 LIGHT COLORADO TOPAZ FLAT BACK GLASS RHINESTONESSS12 LIGHT COLORADO TOPAZ FLAT BACK GLASS RHINESTONES for a little touch of bling.


Here is a close up of the metal filigree with the cabochon and the rhinestones.  I used the cabochon with the Eiffel Tower for a perfect match to the stamped image.


I hope you enjoyed the cards I shared today.  Adding just a little bit of metal to embellish the cards is so easy to do and it really gives a nice finishing touch.

Don't forget to check out ButterBeeScraps
for all of your metal embellishments, filigree, beads and jewelry findings.

Thank you so much for stopping by today!

Hugs & Smiles,
Heidi


Supplies
ButterBeeScraps:
Happy Birthday Card
BRONZE METAL FILIGREE EMBELLISHMENT (#020-B), Black Safety Pin, BRONZE BALL END HEAD PINSBRONZE FILIGREE BEAD CAPS (#CAP827-B), 6X8MM CLEAR FACETED GLASS ABACUS BEADS,  BRONZE FILIGREE BEAD CAPS (#CAP052-B)CLEAR RHINESTONE AND BRONZE RONDELLE SPACER BEADS – 6MM (#BD006-B/CL)

Bonjour Card
BRONZE METAL FILIGREE EMBELLISHMENT (#683-B)SMALL GLASS CLOCK CABOCHONS W/ BRONZE SETTINGSSS20 LIGHT COLORADO TOPAZ FLAT BACK GLASS RHINESTONESSS16 LIGHT COLORADO TOPAZ FLAT BACK GLASS RHINESTONESSS12 LIGHT COLORADO TOPAZ FLAT BACK GLASS RHINESTONES

Other Supplies Used:
Stamps:  JustRite Papercraft
Paper:  White, Kraft
Ink:  Rich Cocoa, Antique Linen, White Pigment
Embossing Folders:   We R Memory Keepers, Sizzix
Accessories:  White Pearls, Baby Pink Seam Binding, Clear 4mm Bicone Bead

Wednesday, July 29, 2015

Pink Ink - All About The Pie Card


Hello everyone!  Today, I have a card to share with you using one of the beautiful stamps from the Pink Ink July release. 


Throughout the summer months everyone is having picnics and family reunions and I am sure there are many different kinds of pies and yummy desserts included.  I love this stamped image with all of the pies!  I stamped the All About The Pie #2251K image on to Kraft cardstock using Memento Espresso Truffle ink.  Then I colored the image using Spectrum Noir Colored Pencils.  


Here is a close up of the colored image.  I added some glossy accents to the whipped topping on one of the pies and sprinkled Clear Rock Candy Distress Glitter on top for a little bit of sparkle.  I also added the glitter on the Sweet die cut (Echo Park).  Then I added some glossy accents to the cherries on the top of one of the pies and to the cherries on the die cut(Memory Box).  I used labels Thirty-Six die from Spellbinders to create the layers die cut shapes.


I hope everyone is enjoying the summer and staying cool! Thanks so much for joining me today!


Pink Ink Stamp Company products used, available online from Ellen Hutson LLC

Or you can visit the Pink Ink Stamp Company website to find a local retailer near you.

Other Supplies Used
Paper:  White, Kraft, Red
Ink/Markers:  Memento Espresso Truffle, Spectrum Noir Blendable Colored Pencils

Friday, July 24, 2015

The Stamp Simply Ribbon Store - Golden Vintage Merry Christmas Card

Hello blogging friends!  Today, is my day to post for The Stamp Simply Ribbon Store.  I have a beautiful vintage style Christmas card to share with you today.  The card is pretty quick and easy to create with a little bit of heat embossing and inking.


Here is the card I designed.  I used the Ornamental Background Stamp and Festive Grand Christmas Sentiments Clear Stamps from JustRite Papercraft.  I stamped both the background image and the sentiment with VersaMark Watermark Stamp Pad and then used Ranger Super Fine Embossing Powder - Gold to heat emboss.  Next I used Tim Holtz Distress Inks Antique Linen and Vintage Photo.  I applied the Antique Linen around the inside of the oval and also inside the diamond rectangle shapes.  Then I used the Vintage Photo around the outside edges of the entire piece.


Here is a close up of the embossing and inking.


Thank you so much for stopping by today! 


Please be sure to check out The Stamp Simply Ribbon Store for all of the fantastic paper crafting products and the Blog for inspiration from the Design Team.

I hope you have a wonderful weekend!

Hugs & Smiles,
Heidi


Supplies
Stamps:  JustRite Papercraft Ornamental Background Stamp, Festive Grand Christmas Sentiments Clear Stamps
Paper:  Ivory Cardstock
Ink:  VersaMark Watermark Stamp Pad, Tim Holtz Distress Inks - Antique Linen, Vintage Photo
Ribbon:  May Arts 1.5" Sheer Wrinkled Edge Ribbon
Accessories:  Simple Stories I AM Enamel Dots, Petaloo Botanica Collection Sugared Burgundy MinisRanger Super Fine Embossing Powder - GoldScrapbook Adhesives by 3L 3D Self-adhesive Foam Squares - MixE-Z Runner Dispenser w/adhesive

Thursday, July 23, 2015

DIY Shabby Chic Vintage Lace Tote - A Special Happy Birthday Shout Out To My Grandpa!

Hello blogging friends!  Today, I have another DIY project to share with you.   But before I get to that I have to give a very special Happy Birthday shout out to my Grandpa.


Today, is my Grandpa's 85th Birthday!!  He is still going strong and very active.  He still goes out to the farm to help my uncle John and he walks everyday--sometimes 5 miles a day!!  He is the ROCK in our family and the sweetest, kindest, and most loving man I know.  He has taught me so many things in life and has a great love for his family and God.  I love you Grandpa!!!


A few months back I picked up this canvas bag to alter.  I knew what I wanted to do with it but just didn't get around to it LOL.  Then last week I watched a couple of videos on YT from some sweet ladies that I follow.  They had done an altered bag swap and it was just the inspiration I needed to start working on my canvas bag.  You can click HERE to see Muriel's video of the bag she received from Luisa and click HERE to see Luisa's video and the bag she received from Muriel.  Both of the bags they altered were so beautiful!  My bag is a little different style than the ones they altered since it has a ruffle on one side. 


Here is the bag after I altered it.  I have to say I LOVE how it turned out!!  It is full of shabby goodness from the vintage crochet lace trim to the venice lace and the rosette trim.  I also added a hand made flower to the top center of the bag.


I love all of the layers and ruffles!  I think the vintage crochet lace trim was from the edging of a small table cloth.  It was also ruffly so it worked perfectly for this bag.


Here is a look at the top of the bag where I used a combination of the vintage crochet lace trim, venice trim, gold ruffle tulle trim, and rosette trim.


Here is a close up of the handmade flower I created.  I used a doily for the bottom layer, three different kinds of lace material, and eyelash trim.  I finished it off by adding a piece of bling to the center of the flower.


The flower is so soft and fluffy.


Here is a close up of the handle and the top of the bag with the rosette trim.


Here is a look at the back of the bag.


I also added some seam binding to hang down from the flower in the front of the bag.  

I am so happy with how this came together!!  Now trying to decide if I keep it or sell it LOL!  Either way one thing is for sure it is a one of a kind.  I know I want to make more and I will be on the look out for more vintage laces and trims.

I hope you are enjoying the DIY projects I have been sharing.  :)

Here are links to a couple of other handbags I have altered.

Thanks so much for stopping by today!

Hugs & Smiles,
Heidi

Tuesday, July 21, 2015

DIY Projects for the Studio - Changing Up Clearance Items with a Little Krylon Spray Paint

Hello everyone!  Today, I have a couple of DIY projects to share with you.  Recently I hit the jackpot on so home decor items and I thought they would be perfect in my studio.   


Last week I shared a few sneak peek pictures of some DIY projects and this was one of them.  I love what you can do with just a can of spray paint and some steel wool.


Here is a close up of the Krylon Aqua paint I used.  Love this color!


Here is a picture of the two pieces I found on clearance.  Both pieces are all metal.  The oval on the pedestal was originally $24.99 and I purchased it for $4.00.  The two tiered heart shape stand was $34.99 and I purchased it for $5.00.  I have a before picture of the oval pedestal (photo below) but I forgot to take a picture of the tiered heart shape stand.  The oval pedestal was originally green and rust and the tiered heart stand was black.


Here is a picture of the oval pedestal before I started painting it.


Here is a close up of the flower after the entire stand was painted.  *Note--the color is a little off in this picture.  The paint is more aqua as you will see in the other picture.  I used a piece of 0000 steel wool to buff/sand off some of the paint in different areas.  I use the 0000 steel wool a lot for buffing/sanding on metal.  It will remove the paint without scratching it.  Once the fibers from the steel wool are brushed off it leaves a nice smooth finish.


Here is the flower after I used the steel wool.  I love how some of the rust and green colors come through and it gives the piece an aged look.


I added SS12 CLEAR AB POINTY BACK CRYSTAL RHINESTONES and SS16 CLEAR AB FLAT BACK CRYSTAL RHINESTONES from ButterBeeScraps to the flower center for a little bit of sparkle.


Here is the entire stand.


This is a close up on the top part of the oval and you can see the different colors and layers of paint.


Here is a close up of the base.


I thought this piece would be perfect to hang earrings on and for only $4.00 I couldn't pass it up.


The next piece is the two tiered heart shape stand.  On this piece I just spray painted it and left it as is.  I used the same Krylon Aqua paint.  Krylon is my favorite brand of spray paint.  I love the color choices and they have paints for so many different surfaces.  I wasn't sure if I wanted this piece to have an aged look of not.  So for right now it is just staying the pretty aqua color and maybe down the road I will change it.


I love the detail on the metal edging.  It looks like lace.


Here is a view from the top looking down.  In the top piece I have a lot of cameos and a few other resin pieces.  The bottom holds all of my washi tape.


These two new pieces make a great addition to my studio.  Don't forget to check out the clearance sections of the store.  You never know what you might find.  Remember you can always change up the color with a little paint.

Thanks so much for stopping by today!

Hugs & Smiles,
Heidi

Friday, July 17, 2015

The Stamp Simply Ribbon Store - Golden Love Card - JustRite Christmas Stamp Set

Hello blogging friends!  Today, is my day to post for The Stamp Simply Ribbon Store.  I have a beautiful gold and white card to share with you.  I don't know about you but I love it when I can get double duty out of my crafty products.  With today's card I will show you a stamp set that is a prefect for double duty.


Here is a look at the JustRite Clear Stamp - Christmas Handwritten Sentiments.  I have to say I love this stamp set!  Yes--it is a Christmas stamp set.  No--I didn't create a Christmas card with this stamp set.  LOL!  I love the font for the words and the tiny little leafy sprigs.  Plus there are several of the words that can be used to create cards for all occasions.


Here is the non Christmas card I designed using the Christmas Handwritten Sentiments stamp set.  I am going to use this card for a wedding or anniversary.  I used all white cardstock and accented with gold.  I used gold embossing powder and also a gold metallic wax finish.


The card is a top fold A2 and I placed half of the cardstock in the Spellbinders Celebrations Embossing Folder - Doily Art to emboss just the front of the card.  Then I lightly rubbed on the DecoArt Metallic Lustre Wax Finish - Gold Rush over the embossed area.  The gold is so bright and pretty.


Here is a close up so you can see the pretty shimmer from the gold.  Adding the DecoArt Metallic Lustre Wax Finish - Gold Rush really makes the embossing pop.


I used Spellbinders Celebrations Die - Pierced Hearts to create the die cuts.  Then I used VersaMark Watermark Stamp Pad to stamp the images from the Christmas Handwritten Sentiments stamp set.  Then I heat embossed the sentiment and images using Ranger Super Fine Embossing Powder - Gold.  I layered the hearts and added 3D Self-adhesive Foam Squares - Mix for some dimension.  Next I added some clusters of Stamens by Marion Smith Designs - White Pearl and then also some Prima Lil Missy - Rose White and Melissa Frances Pearls - White.  When the flowers come in the package they are completely flat and I wanted some dimension to them so I scrunched them up.  


Thank you so much for stopping by today!  I hope you enjoyed today's card as much as I enjoyed creating it.

Please be sure to check out The Stamp Simply Ribbon Store for all of the fantastic paper crafting products and the Blog for inspiration from the Design Team.

I hope you have a wonderful weekend!

Hugs & Smiles,
Heidi

Supplies
Stamps:  JustRite Clear Stamp - Christmas Handwritten Sentiments
Paper:  White Cardstock
Ink:  VersaMark Watermark Stamp Pad
Dies/Folder:  Spellbinders Celebrations Die - Pierced HeartsSpellbinders Celebrations Embossing Folder - Doily Art
Accessories:  Prima Lil Missy - Rose WhiteDecoArt Metallic Lustre Wax Finish - Gold RushStamens by Marion Smith Designs - White PearlMelissa Frances Pearls - WhiteRanger Super Fine Embossing Powder - Gold, Scrapbook Adhesives by 3L 3D Self-adhesive Foam Squares - MixE-Z Runner Dispenser w/adhesive

LinkWithin

Related Posts Plugin for WordPress, Blogger...